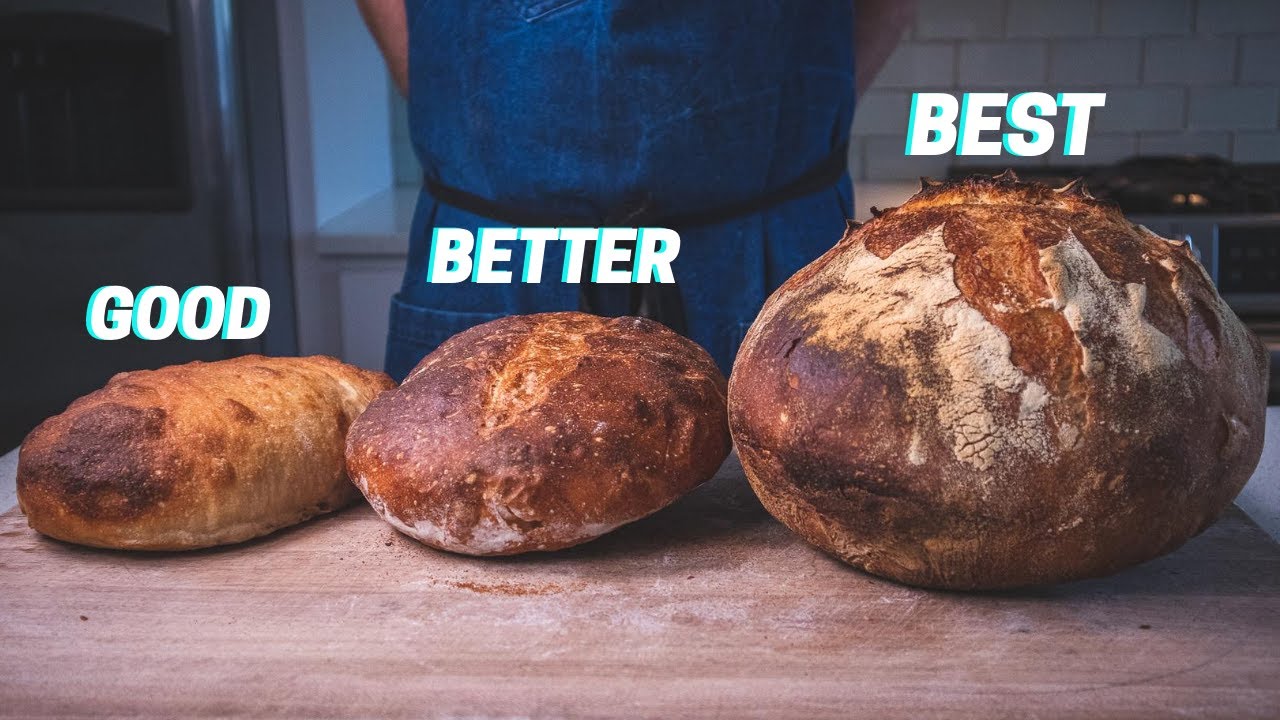
1 DOUGH 3 LOAVES | The Easiest (Actually Good) Bread You Can Make

In this video I’ll show you how to make three versions of easy rustic bread using one simple dough. Take your pick! All of these loaves are beginner friendly and with a few small variations on shaping and baking, you’re left with a rustic, crusty, bread worthy of your dinner table. No mixer or sourdough starter required.
Thank you for watching! If you’d like to show me some love and buy me a coffee, head here:
Will you be baking this bread? Don’t forget to take pics and tag me on Instagram @Brian_Lagerstrom
VIDEOS YOU MIGHT ALSO LIKE:
– EASY BAGUETTE:
– 5 TIPS FOR BETTER SOURDOUGH:
– SEEDED SOURDOUGH:
– NO KNEAD SOURDOUGH:
INGREDIENTS:
****TO MY FRIENDS IN EUROPE/UK: The all purpose flour that i typically use is King Arthur which is about 11.7% protein. Your All Purpose flour may be different than what’s available in the US. If in doubt, choose a flour that has between 11-12% protein and you should be in good shape!
ALSO if you have never made bread before, this dough is 78% hydration and will be slightly sicky. Use 75 less grams water in the final dough and it will be much easier to handle.
PREFERMENT (POOLISH)
150g or ROUGHLY 1 C. AP FLOUR
150g or ROUGHLY 2/3C. WATER (ROOM TEMP)
1 small pinch YEAST
– let the poolish ripen on counter 4-24 hours, preferably at least 16
DOUGH
280g or 1 1/4C.WATER (98F)
2g or 1/2 TSP YEAST
ALL OF THE POOLISH
350g or 2 1/4 C. AP FLOUR
50g or ROUGHLY 1/3 C. WHOLE WHEAT FLOUR
10g or roughly 1.5 TSP KOSHER SALT
BAKING TIMES/ TEMPS
METHOD 1: 525 the whole time for 14-18 minutes (spray loaf for steam)
METHOD 2- Preheat Dutch Oven at 500 for 30-40 minutes, bake at 500 covered for 12min and 485 uncovered for additional 8-12 depending on oven and desired color.
METHOD 3: Preheat Dutch Oven at 485-500 for 30-40 minutes, bake at 485 covered for 18 minutes, and 485 uncovered for additional 25-30 depending on oven and desired color.
**MY GEAR**
5.5 qt LE CREUSET DUTCH OVEN:
MY FAV STAINLESS STEEL MIXING BOWL:
PLASTIC DOUGH CARD:
MEASURING CUPS/SPOONS:
HALF SHEET PAN + RACK:
BOOS BLOCK CUTTING BOARD:
**DISCLAIMER: Some links in this description may be affiliate links. If you buy any of these products using these links I’ll receive a small commission at no added cost to you. All links are to products that I actually use or recommend. Thank you in advance for your support!
#beginnerbread #easybreadrecipe #bread
|| MUSIC ||
EPIDEMIC SOUND. Free trial available at:
bensound.com
–––––––––––
source


It's real big old loaf of bread. Is it ok to cut the ingredients in half for a smaller bread? Or will the result be completely different? 🥲
Great, thanks!
The temperatures for the oven are in Fahrenheit, right? Thanks for the lovely video!
Tried the second method using Einkorn all purpose and Einkorn whole wheat flour. Turned out amazing. Probably the best bread I've ever made. I made a olive oil and herb dip to go with it.
Hoping you see this and can help me. Love this recipe but my boule won’t rise… ever. I’ve followed your recipe to a T, many many times, and the finished product never looks like yours. Still delicious, but I’m going for looks.
This recipe has given my family so much joy! Thank-you, truly my teenage sons have joined me in the kitchen again thanks to this <3
For those unfortunate souls who don’t have a dutch oven, but want the same crusty-crust—some of those disposable aluminum lasagna pans work well to trap the steam. I got several for a buck at the dollar store and put one on top of another to create a clam-shell-steamy-sauna for the loaf. Worked a treat and super cheap comparatively! I’ll be making this loaf again and again😊
What can i use if i dont have a dutch oven?
Amazing xD!
Do you use the whole recipe for the 3rd preparation the big dog?
I made version three of this bread yesterday and it’s one of the best breads I’ve ever made.
Head's up to other bread lovers. I made the best dough of my life using this video. Then I tried transferring it to the Dutch oven and the dough collapsed. I'd recommend fermenting the dough on baking parchment for the last round. Then use the baking parchment to carefully transfer the dough to the Dutch oven so it holds its shape.
Mixed results: flavor is very good, but not getting the rise or not like in the video. Turned out more dense vs light and fluffy, clearly I’m doing something wrong. Working on figuring that out. …
No matter how many times and how carefully I watch this video and then try and try again to replicate every movement, this is sadly an abject failure time and time again. It is always far too wet and sticky and never ends up smooth and strong like your Brian. Each time when I try and pick it up to put it into the dutch oven it oozes into a puddle and slops in to the pan. While it gets some rise, it is still a sad looking dense disc by the end of cooking. I so wanted this to work and I am at a loss of how to progress. 🙁
Brian, I baked the big one twice, but for some reason it does not want to rise like yours… I don't know what I'm doing wrong…
Any breadheads know if the proofing can be done overnight in the fridge? If yes, do you have to bring to room temp before baking?
Why do you call it a "Dutch oven"
It's just a "Braadpan" lol
Liked and subscribed. Wonderful instructions, simple, well laid out and informative. Thank you ! Going to make this today and then again for Thanksgiving, and probably Christmas.. .. and probably al the time .. haha
Love the no nonsense approach and obvious skill, knowledge and understanding of baking great bread. Thank you for sharing your wisdom w us.
i tried this recipe too and i think it needs less water, probably due to the type of flour we have here. I live in the netherlands for reference. I would honestly try with about 100ml less water and then add little bits of water until the consistency is right, because the amount of water given by the recipe made my first batch impossible to work with so i added a bunch more flour after thr first proofings and skipped the last proofing step and went straight to baking. Bread turned out very tasty and the crust was amazing, but it was just too dense. I now tried the recipe with less water and it turned out much better, and wayyy less cleanup too
Will all purpose flour work for this? I've got a ton I need to use up. I'm thinking about making a nice bread for thanksgiving dinner for my family that they'll all like.
No thanks, for a American channel using metric is a no go
Thanks for your very detailed video. I only make the big dog loaf. Your directions are clear and concise. I use your recipe to the letter and it works beautifully. I have added 25Gms of black sesame seeds to your recipe to add nuttiness. Fabulous. The bread is awesome toasted with real butter and apricot jam. Stunning.
Thank you! 🥰
Would you put stuff like olives or Jalapeno peppers or maybe some dried tomatoes, in the doe to give it a little extra taste
You have dried yeast. Do you still have to make preferment if you use yeast that's frigirated?
that kitchen makes me feel sad. too bare and clinical for a kitchen.
Can you extend the bulk fermentation by moving to cold fermentation bringing back to room temp the following day and doing an additional fold and rest
I am fairly new to all this baking. Why does he measure liquids in grams?
Anyone know how many kcal is in this bread? I wanna bulk with it.
I’ve made this 4x’s now, and I can’t seem to get the big dog loaf to proof to the same height after 50 minutes. Any thoughts on what I could be doing wrong, anyone?
I'm a bad dog and I used my bare hands to lower that dough. I've got to say best and most complete beginner bread loaf bake video. Super clear instructions. No robotic, convoluted way of speaking. You're like one of my buds, but legit at baking.
What is the limit for "more time means more flavor" when it comes to the poolish?
5:35 Shchrong?!?
Very informative, lots of facts and results. Thank you!!
I've made this 3 times now (big dog version) and it's amazing…like..really really amazing. I never knew I loved to bake…its awesome and thank you. If I wanted to make 2 big dogs at a time, do I just double the recipe? Do I double everything but the yeast? Or is it basically make as many preferments for each loaf you need. Would love to know
I’m loafing around tomorrow and the next day after. I hope it’s worth it. Lolololol
Some suggestions: 1.) No need to preheat your dutch oven for 30-40 minutes. That's a waste energy. When the oven has reached temperature (15 min.), that thing is hot! i.e. same temp as the oven. 2.) Don't waste plastic. A towel works perfectly fine. 3.) Don't use a metal bowl. Your dough will rise faster and more if you use a non-metallic bowl. I use a melamine bowl. Also, do not leave it proofing on a stone, quartz or SS counter. Put it on a cutting board or a cooling rack to break the heat sink.
Does the water and flour in the poolish count in the flour/water ratio? If yes, that ratio is 78%, which seems on the very hydrated side to me. And indeed, the first time I tried the recipe, the dough was very sloppy and difficult to work. I experimented with smaller amounts of water and the result seems better. 240g of flour and 400g of water gives the "standard" 60% ratio, or 71% if factoring in the water and flour in the poolish.
I couldn't get the "slack boy" to shape up to a ball. Any suggestions or ideas where I went wrong?
dope <3
Can all be all pourpose flour? What happens if you don't use whole wheat flour?
Nice
I came here from An American Homestead – not disappointed. Sub'd
I’ve watched this multiple times and the robust crust comment always makes me laugh.
Plastic wrap has the expense and waste aspect to it, a wet kitchen towel works just as well.