

7 Techniques For Homemade Pasta ⬇️ SCRUMDIDDLYUMPTIOUS RECIPE BELOW ⬇️ Making pasta from scratch might sound complicated, but it’s actually incredibly fun and easy! We’re going to show you how to make the perfect pasta dough from scratch, and then show you how to use it! Now you’ll be able to make 7 different types of delicious pasta, right at home!
📌 FULL INSTRUCTIONS:
➡️ Thanks for watching and don’t forget to subscribe for a first-hand look at all our best recipes and cooking hacks:
******************************************************
Homemade Pasta Dough
You’ll Need:
– 3 cups flour
– 1 egg + 5 egg yolks
– ⅓ cup water
Heres’s How:
Heap the flour into a pile on a clean work surface and form a large well in the center using your hands. Add the eggs and water to the center of the well and start mixing them with a fork. Gradually start incorporating the flour, being careful not to let the eggs spill out of the well. Once the flour is incorporated and a smooth dough has started to form, set a timer for 7–8 minutes and continue kneading by hand. You’ll know that your dough is read by lightly pressing your hand into it. If the dough bounces back, you can move on to the next step! Wrap the dough in plastic wrap and refrigerate for 30–60 minutes. Once it has chilled, divide it into smaller sections and wrap them up individually.
* * * * * * * * * * * * * * * * * * * * * * * *
1. Garganelli
You’ll Need:
– 2 pieces of twine
– wooden cutting board
– wooden skewers
Here’s How:
Lay 2 pieces of twine on your work surface and place a wooden cutting board on top. Cover the board with wooden skewers positioned horizontally and tie the 2 ends of each piece of twine together. Roll out the dough and cut it into small rectangles. Dust flour on your pasta board, then place 1 of the pieces of dough on it. Use a chopstick or wooden skewer to carefully roll and stretch the piece of dough over the pasta board so that it takes on the texture of the grooves in the board. Roll back the chopstick slowly, and you’ve made garganelli!
* * * * * * * * * * * * * * * * * * * * * * * *
2. Farfalle
You’ll Need:
– fork
– empty picture frame
– new pair of tights
Here’s How:
Roll out the dough until it’s very thin and cut it into small rectangles using a knife or pizza cutter. Use a fork to carefully press divots into the sides of the dough, then squeeze the center of the rectangular piece of dough between your index finger and thumb. To dry the farfalle, stretch a new pair of tights over an empty picture frame and place the farfalle on top.
* * * * * * * * * * * * * * * * * * * * * * * *
3. Castellane
You’ll Need:
– tape
– toothpicks
Here’s How:
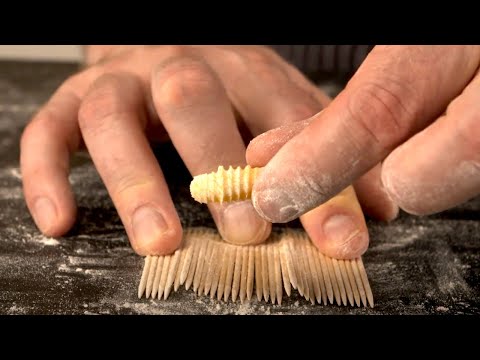
Roll the dough into a log about 1 inch in diameter and cut it into small segments. Lay some toothpicks next to each other and tape them together at one end. Slowly roll the pieces of dough over the toothpicks so that they take on a rippled texture, and you’ve made some castellane!
* * * * * * * * * * * * * * * * * * * * * * * *
4. Orecchiette
Roll the dough into a log that’s about 1 inch in diameter. Using a butter knife, cut out pieces that are about ½ to ¾ of an inch thick. Place the butter knife on a piece of dough, press down, and slowly pull it towards you. The tension causes the dough to curl up into the shape of a small ear.
* * * * * * * * * * * * * * * * * * * * * * * *
5–6. Tagliatelle & Pappardelle
Roll out the dough into one long, thin section thin enough to see your hand through. Dust the rolled out dough with flour to prevent it from sticking to itself. Carefully roll the dough up loosely and cut even segments out of the roll. Unravel each segment and your homemade tagliatelle is ready! If you cut the dough into slightly thicker segments, you’ve made pappardelle.
* * * * * * * * * * * * * * * * * * * * * * * *
7. Tortellini
Roll out the dough and cut it into 1½ by 1½-inch squares. Prepare some filling ahead of time and place some of it in the center of each square of dough. Fold one of the corners over to meet the opposite one, then carefully push out any excess air. Once everything is nice and sealed, connect the opposite corners to one another in the shape of a small crown.
******************************************************
Do you want to see more content like this? Scrumdiddlyumptious brings you unique recipes & cooking hacks every day, so be sure to subscribe, like, and follow us for a first-hand look at new videos that you can share with your family & friends!
💚 YouTube:
💚 Facebook:
💚 Instagram:
💚 Pinterest:
💚 Website:
******************************************************
source