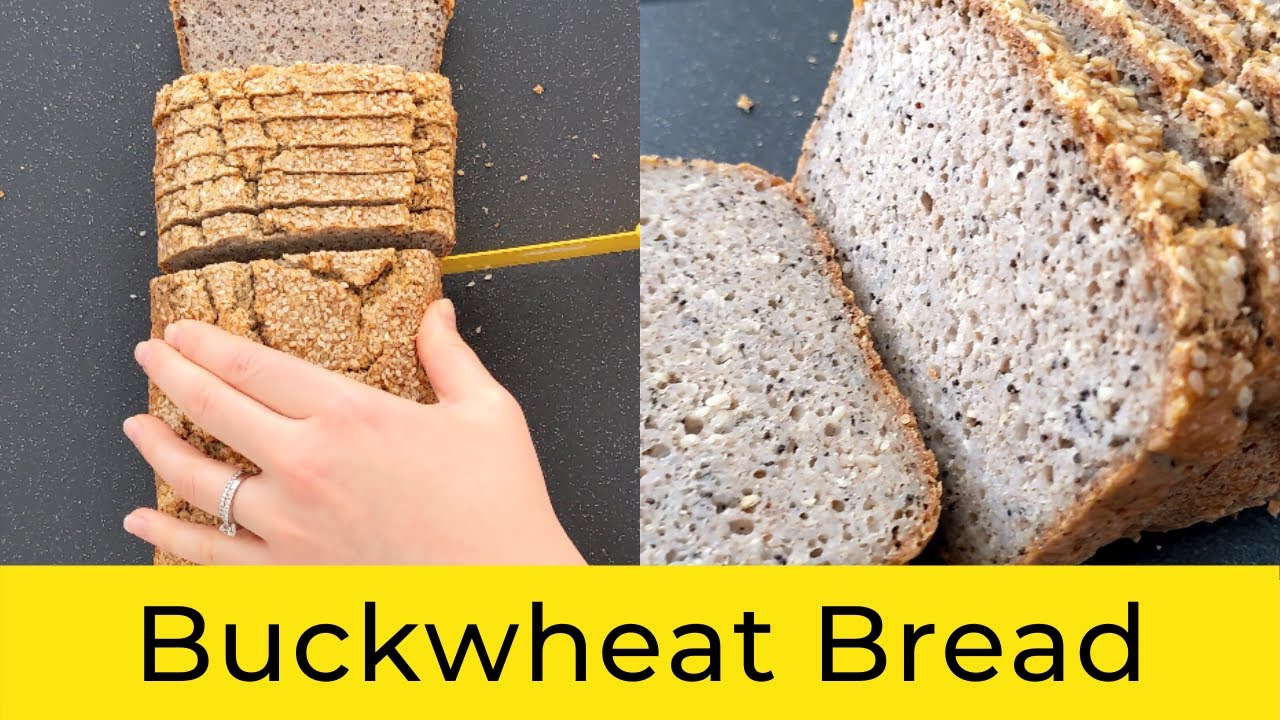
Buckwheat Bread Recipe [GLUTEN FREE, VEGAN, EGG FREE, DAIRY FREE, YEAST FREE] Easy Buckwheat Bread!

This bread takes some time, but the hands on portion is maybe around 10-15 minutes. Everything else is just letting the fermentation process work it’s magic!
Step 1:
Add 500 grams of raw buckwheat groats to a glass or ceramic bowl. Cover with 600ml of filtered water. Stir and cover with a plate or tea towel and leave on the countertop for 12-24 hours.
I use this brand of organic buckwheat that comes in 500g packages:
Step 2:
After 12-24 hours, the groats will have absorbed all the water. They will be slimy (this is good! Do NOT rinse!) and may or may not have sprouted (don’t worry if they have or haven’t – the bread will turn out great either way). Into the same bowl, add 150ml filtered water, a teaspoon of salt and a teaspoon of honey. Use an immersion blender to blend everything together. You may also dump everything into a food processor, then return to the same bowl. Cover, and let sit for another 24 hours on the counter.
Step 3:
After 24 hours, the batter will be frothing, foaming and bubbling. Some spots more than others. It will smell a bit (or a lot) funky. This is good news! Now is the time to add in any flavourings you’d like. You can keep it plain (delicious), or you can try adding hemp seeds, sesame seeds, chia seeds or flax. I love making an everything bagel version (poppy seeds, sesame seeds, granulated onion and garlic). You could also try cinnamon raisin or herb and garlic (granulated garlic, dried dill, dried parsley, dried coriander). The possibilities are endless, and there’s no need to measure your add ins – use as much or as little as you want!)
Gently mix in your add-ins, then transfer to a greased and lined loaf pan. Bake at 350F for 50-90 minutes, until a toothpick inserted into the middle comes out clean.
Let cool in the pan, then slice, TOAST, and enjoy!
0:00 intro
0:46 directions for making buckwheat bread
1:32 finished buckwheat bread
1:50 trying the buckwheat bread
Follow for more
This recipe can also be found on my blog here:
source

It’s already quite watery after day 1 and blending it with honey and salt
Is it necessary to add another 150ml water ? Sophie’s video showed lot of water absorbed by the grits… in my case not much absorbed but it was frothy and bubbly. Did anyone find it turned out ok without adding additional 150ml water?
It’s already quite watery after day 1 and blending it with honey and salt
Is it necessary to add another 150ml water ? Pls advise
How bid is your pan? Do you mix the everything bagel seasoning IN the dough or ON top of the dough? Thank you for this recipe!
best bread I’ve ever tasted! feels so healthy too!
Now I am thinking to not make a loaf, but to spread the dough out in a glass baking dish and make a thinner bread, maybe a flat bread, bread sticks?.
Mine came out wet on the bottom and mushie inside. I toasted the ends and they were awesome. Next time less water higher temp.
Hello, quick & easy video! Can using vegan milk instead of water be permitted?
Thanke you Dear! 🙂 this recipe is just fabolous! The best to find out there and so easy to make. I will keep it! ❤P. S. Even a sweet version tastes wonderful. Like throwing cinnamon and raisins or figs into it.
❤
Just a heads up if you're a diehard vegan, honey is not vegan. Unlucky lads! Bread looks nice – will give it a shot.
I made this. It's wonderful! Make sure to add parchment paper to all sides or it will stick to glass. Sesame seeds on top is a perfect complement. I will try other toppings and add-ins as I continue making it. The texture is lovely right out of the oven. Soft and fluffy on the inside. Also amazing when toasted. The texture becomes chewy and crispy on the outside and also densely chewy on the inside. Really amazing. Lovely plain. I also tried it with butter. Very satisfying and will go with any dish. I love that it is gluten free and oat free and that it is also fermented which is gut microbiome friendly.
Hi do you drain the buckwheat after soaking.
damn it, came for a bread recipe, but ended up falling in love.
I love this fermented buckwheat bread! Great video. I’ve just subscribed. Thanks!
So you didn’t change first water? just added more and blended ?
Is it also tasty without toasting?
I made it and it didn't bake in the inside. I soaked the groats for 24 hr,. as instructed. Blended in food processor added salt and maple syrup, let stand another 24 hour. Poured into prepared glass bread loaf pans and baked 350 for 2 hours. It was hard on the outside and a firm mush on the inside. I was sad it did not turn out like yours.
Can I use maple syrup or coconut sugar instead of honey?
Did you lightly rinse the groats before soaking them?
This is not vegan if it has honey in it. Vegan = no animal abuse. Bees are animals.
Thank you for this recipe! We love it! I give it a little twist and it turned out great! I also shared it on my page and your link as well! Thanks so much for the recipe🥰
Is salt and honey is cumpolsory r we can made this bread without honey and salt?
I wonderIf thats how they make Paca bread that is new in market but I refuse to pay $12 for loaf size!! Thanks for video ❤
Can I quit the sweetener?
CAN I MAKE WITHOUT ANY SWEETNER? WITHOUT HONEY
lol the enthusiasm is a high pass LOL
Hubby is allergic to honey. Sub maple syrup?
That’s absolutely brilliant 😀🌹🌹🌹 I just knew about a research saying that it lower the blood sugar level for diabetes 👍👍👍
Can this be made without the fermentation? Maybe after soaking put baking soda and appel cidar for creating air in the batter/dough?
Honey is NOT Vegan mate! Correct your title.
Thanks for the recipe. The bread came out very good and tasty, especially after toasting it twice. However, I'm not sure how the texture is supposed to be when it comes out of oven. The surface was crispy, but the sides and bottom part of the loaf came out softer than expected. I'm not whether this is normal?
Hi
I would like to know what the nutritional facts of this recipe is.
Would you please share it with me?
Thank you
Loaf pan size Is it a 8.5 x 4.5 x 2.5” = 6 CUPS pan OR a 9” X 5” = 8 CUPS pan size?
Is it good to make sandwiches with it?
Hello Sophreakingood & happy followers.
This recipe looked so good & the replies were so positive I had to give it a go!!!
Unfortunately my loaf turned out like a bag of glue. Too wet is my conclusion.
I’m in Thailand and my (untoasted) Buckwheat groats were from the EU. I followed the simple instructions exactly.
I cooked the loaf for 90 minutes at 350F, and the thermometer was sticky when I pulled it from the loaf. I put the loaf back into the oven until I got a 210F reading which took 3 hours. I pulled the loaf out and waited 2 1/2 hours to let it cool before cutting it.
When I cut into it the bread was like a wet sponge, dense and gooey looking. I’ll try and salvage it for croutons. I’ll put the slices into a 250F oven, low & slow to see if I can dry out the slices.
I’d LOVE to get this receipt right as it tasted soooo good even with a botched first attempt.
Any ideas or corrective suggestions are warmly welcomed.
Many thx…
I'm vegan and just to let you know: honey ain't vegan. Otherwise, I'll try it out! But please, fix your title, be honest with the viewers….
Is there any risk of bacterial contamination from leaving it wet on the counter for 2 days?
I made this bread, it's delicious. I have one question though. Why soak buckwheat for 12-24 hours if it becomes soft and ready for a blender in just a couple of hours. Thank you.
My second loaf… In the oven now🔆 Smells healthy, looks healthy, taste healthy… Guess its healthy! And sophreakingood toasted😋 And love love love your short video! ❤ Thanks