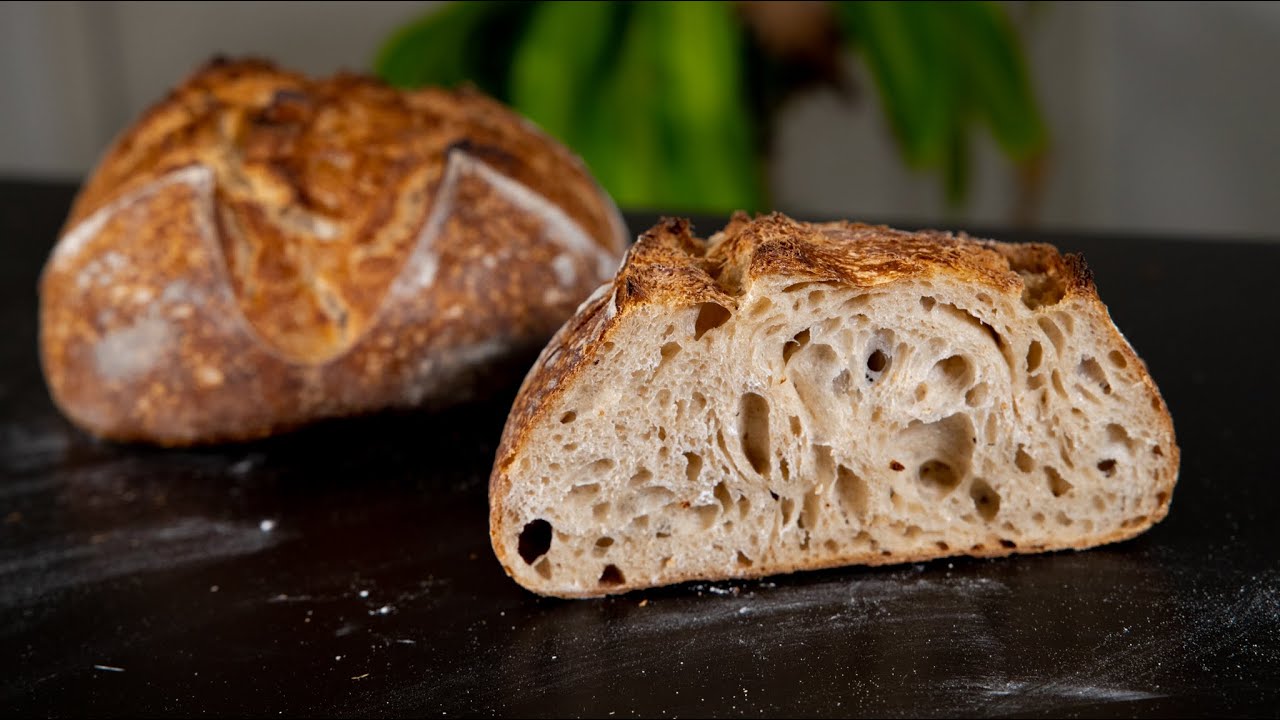
EASY SOURDOUGH BREAD RECIPE | TARTINE BASIC COUNTRY BREAD

In this video, I show you how to make Tartine Bakery’s Basic Country Bread. It’s an easy recipe for sourdough bread that anyone can follow to make delicious loaves at home!
INGREDIENTS YOU’LL NEED
LEVAIN
50g Mature Sourdough Starter (~1/4 Cup)
40g Whole Wheat Flour (~1/3 Cup)
40g White Flour (bread flour or all-purpose) (~1/3 Cup)
80g Room Temperature Water (~1/3 Cup)
REMAINING DOUGH
900g Unbleached Bread Flour (~7.5 Cups)
100g Whole Wheat Flour (~0.8 Cups)
750g Room Temperature Water (700g initially + 50g added after autolyse) (~3 1/8 Cups Total)
20g Kosher Salt (~3 1/3 tsp) (VOLUME CAN VARY DEPENDING ON TYPE OF SALT USED)
VIEW THE FULL RECIPE AND SAMPLE BAKING SCHEDULE ON MY WEBSITE
HOW TO MAKE A SOURDOUGH STARTER (VIDEO)
DOWNLOAD MY FREE SOURDOUGH QUICK START GUIDE
Includes everything you need to know to bake your first loaf of sourdough bread!
ENROLL IN MY SOURDOUGH MADE SIMPLE COURSE
ESSENTIAL SOURDOUGH BAKING EQUIPMENT
Challenger Bread Pan – (Upgraded Version of Lodge Combo Cooker):
Lodge Combo Cooker:
Bannetons, Bread Lames, and More:
Proofing Box:
CHECK OUT MY MERCH
CHECK ME OUT ON INSTAGRAM
VISIT MY WEBSITE
CHECK OUT MY OTHER CHANNEL (Stock Market Focused)
ADDITIONAL RESOURCES
Tartine Bread Book:
More information about baker’s percentages:
How to Make and Maintain a Sourdough Starter:
How to Get a Better Oven Spring:
Complete Sourdough Baking Guide (playlist):
How to Make a Homemade Proofing Box (Video):
Pre-Built Proofing Box:
SOURDOUGH BAKING EQUIPMENT
Challenger Bread Pan (Upgraded Version of Lodge Combo Cooker):
Lodge Dutch Oven Combo Cooker:
OXO Digital Scale:
Di Oro Rubber Jar Spatula:
24oz Wide-Mouth Ball Jars:
Dough Whisk:
OXO Mixing Bowls:
Cambro CamSquare Container:
Flexible Bench Scraper:
OXO Stainless Steel Bench Scraper:
Oval Bannetons:
Round Bannetons:
Food-Safe Plastic Bags:
Bread Lame:
Oven Mitts:
Checkered Chef Cooling Racks:
OXO Cutting Board:
Mercer Culinary 10-Inch Bread Knife:
All:
PROOFING BOX INFO
How to Make a Homemade Proofing Box (video):
Styrofoam Cooler:
Seedling Heating Mat:
Temperature Controller:
Checkered Chef Cooling Rack:
RECOMMENDED SOURDOUGH BOOKS
Tartine Bread:
Flour Water Salt Yeast:
ALL OF MY COOKING EQUIPMENT
All:
Bowls, Jars, and Containers:
Countertop Equipment and Appliances:
Knives and Miscellaneous Utensils:
Pots, Pans, and Baking Equipment:
Recommended Ingredients:
Sourdough Baking Equipment:
RECOMMENDED BOOKS
MY VIDEO EQUIPMENT
Intro Music by Prod. Riddiman
This page contains affiliate links. If you purchase a product through one of them, I will receive a commission (at no additional cost to you). I only ever endorse products that I have personally used and benefited from. Thank you for your support!
source


BEST SOURDOUGH RECIPE… I baked two of the best sourdough loaves ever on my first try with this recipe. I've tried lots of recipes and techniques, often with mixed results (often a lack of rise and oven spring), but this one really was far and away the best..
Holy molly , i will never do it , too many steps , and its not fun lol
Too many ads I can’t even skip to any part of the video I want without watching 1 billion ads every 2 seconds
What do I do to reduce the size of holes. I'd rather have multiple smaller holes than big holes or tunnels.
Great video! What is in the oven under your dutch oven when you bake? It almost looks like a cutting board. I am wondering because the bottom of my crust burns often and something like this may help. Thanks.
When I tried 70% hydration from another recipe, I thought I messed it up somewhere along the way, because the dough was "too wet" and here I am, watching one with an 80% hydration.🤣🤣🤣
Labor of love! ❤️
I teach Chad Robertson's Tartine method sourdough at a local university. I have developed a very simple process, no weighing or thermometers, just measuring cups, spoons and time I provide a great starter which originally came from the Boudin Bakery in San Fransisco. It was given to an 8 year old baker during her visit to the bakery. To 1/2 cup of start I add 2 cups room temp water, stir and add 4 cups of bread flour or 1 cup whole wheat flour and 3 cups bread flour. Then the 3 hour tartine stretch and fold. This is divided into 2 loaves, shaped, put into bannetons, plastic bags and the refrigerator for 8-12 hours. Then a major change. The loaves go from the refrigerator into a 7" diameter stainless steel dog water bowl from $Tree that is $1.25. I use 4 bowls, 2 to hold the loaves and 2 as top covers. This cooks at 475F for 20 minutes, is uncovered for about 10 minutes until the desired color is reached. This is simple and cheap. The students each get 4 cooking bowls to take home as part of their bread class. The bread they make is great.
Thank you so much, your recipe is amazing, I never thought I could make such a beautiful tartine bread! I think I will keep this recipe for the rest of my life!
I have never made this recipe probably eight maybe 10 times… The first time it was perfect ever since though I’m really stuck (no pun intended) at the step on around 7:30. When I flip it onto the area After the last fold, it’s not as structured and seems to not stay together as much as it should. Also it’s a bit too sticky and gets stuck on bench scraper… I finally get it to tighten up a bit but it deflates a little more than in video here. So frustrating. I can’t figure it out…. Starter is strong… follow all steps exactly… the bread rises nicely. Not AS big as first time. Good. Really good actually BUT not as GREAT as first time and as in video. Why does it deflate when left on bench to rest 😢 ugh. 🥖
Can you please make a video on how to add inclusions into sourdough bread like multiseed, olives, etc.? Many videos do it differently and I really like how you explain things.
Most all the sour bread recipes are easy – it’s the starter thats a pain in the a** 🤯
Thanks for the great explanation🙏
After the whole stretch and fold time tho my dough was quite different to yours and flowing off in all directions, any advices?
Thanks!
Everytime I make sourdough the dough is really wet. I added less water and it is still very sticky. When you do the 4th pull it all sticks to the side and shaping the loaf is impossible. I added more flour to shape it and it helped. The final loaf tasted very good but it didn't rise enough. Still very edible though
I have been making sourdough bread for about a month. It wasn't rising properly but it was still edible. I followed all of your instructions and this is my best bread yet. I still need to get the hang of building tension but I am getting there. This is the only recipe I will use, no more searching. Everyone says you need to get a feel for the dough but I didn't know if I was under or over proofing and you are very specific with your bulk rise instructions and that was a big part of my problem. Thanks so much for an excellent video with clear specific instructions.
🤷♀️
Soooooo …
You bake the bread right out of the fridge ?
It doesn't need to come to room temperature first ?
last proof after shape would 1 hour outside and 1 hour fridge equal to 4 hour in fridge?
Wow bột tẻ tinh khiết
Why is my dough always so sticky? My dough never holds the shape the way yours does. Mine always flattens and my hands and scraper stick to the dough. I use 70% water. I have tried 80% and down to 50%. It is always, always sticky. Help!
This is my first time making my own sourdough. I know it might take some practice, but I am hopeful that it'll be delicious.
why use a levean and not just a recently fed starter (approx 3 hours before baking)?
Do you let the dough come to room temperature after the final fridge rise and before baking-or do you go directly from the fridge to the oven?
Good but too fast for me. Relax and cut the unnecessary stuff if you need to make it short.
bulk in only 2hrs that is quick
I’ve seen some tartine videos where people hand mix the dough for ten minutes and do the window pane test before the bulk rise, is there a reason you don’t do that in this?
I’ve made your recipe several times and never came up with that crumb “ why” I follow your recipe to the tee I also form like you do.
My main question is, why do you let it set in the fridge? Mine came out with no sour taste. Other recipe Iv tried you let it sit out in room temperature covered to raise, and they were really nicely soured in their taste. My sourdough was much moister than others I have tried. The bubbles and crust look great. I really want to try this recipe again and hope to get a slight better raise next time. My cuts also did not show.
Why is my dough so sticky and yours is not? I only use 700g of water to reduce the stickiness. And it never seems to hold its shape. Always flattens when it is resting. Very frustrating.
Закваска
WHY don't you discuss the float test in more depth? I get great loaves, tho my levain rarely floats…..and why is that? I'm following your ratios/recipes….plz don't bypass that very anxiety-inducing moment for bakers! explain—or maybe it doesn't matter…?
If we lower down the water temperature at mixing step about 4C, will it hinder the gluten formation of dough?
I’m absolutely flummoxed! Have done this recipe a dozen times and the last time and today, by the time I got to the 3rd set of folds the dough was not stretching, in fact it was breaking. Added 2 extra sets of folds thinking I did something wrong. What could I have done wrong this time? My starter floated. I mixed the correct amount of flour and water….cannot figure it out. SOS-HELP
Best I have baked so far too. Dough was not very easy to handle for me, quite sticky even after 12 hrs in the fridge, but it’s worth it. Baked with half the measurements, 30 min with close lid, 15 mins open. Inside was 100 deg C when I opened the lid. Spongy and chevy, I will bake this all the time. Thank you.
Super great video you made it look so easy.
Thank you for posting your nice sourdough bread recipe. however as I mentioned in my other comment for your other video, you talk too fast with no pauses, kind of liked it a drill sergeant ! it makes me so nervous because you don't leave time / pauses for the viewer to absorb your information. The speed of your voice over is mind-boggling ! Slow down, joke a little, take the edge off your presentation so that the viewer who's trying to learn can relax & be at ease. that is my two cents worth and critique of your videos. I hope you'll find it useful for your future videos.
I’ve been using this recipe quite a bit but the crumb never comes out open like this video and I follow it exact and shape like you do. You talked about making a more advanced video when are you going to do that.
Alguien que traduzca la receta y indicaciones en español x favor
Thanks for the tip on keeping bulk rise to 3 hours to stop over proofing. This works for me. 3 hours 15 minutes, then shape and put in fridge. My question is how do some people get away with a 4-6 hour bulk rise and still have good results? When i did this i had a bowl of slimy mush. Thank you
salt? did I miss it?
I just completed this baking journey and I am at high elevation and only adjusted cooking temp and time. The bread I made was incredible! The ONE thing I would do differently – and just for me, is I would have a longer refrigerator ferment time. I made one boule after leaving in fridge for 5 hours and the bread rose nicely and the taste and texture was amazing. However, I also made a "loaf" but it was late and I left that in the fridge for the rest of the night and baked it this morning. The rise on it was even better and I had to trim some excess off the pan and made one medium sized roll, lol! Due to increased air pressure, rises at elevation do take a little longer and I often forget that. All in all I loved this technique and recipe and it was perfect! Thank you for sharing! 😉👍
Great video and spectacular results. Did I understand correctly that you set your proofer box to 85°F? What dough temperature are you trying to achieve/maintain during the bulk fermentation? 85°F? I’m wondering if that’s why you can bulk fermentation for only 2 hours, which seems short. Thanks for making and sharing this video.
Great recipe! Just baked mine and it turned out great 👍🏻 awesome video amd instructions – highly recommended
I tried this recipe this weekend for my first time making sourdough, and followed everything to a T. My loaves had a nice rise to them but we’re pretty dense and didn’t really have any of those nice, big, airy holes. Do you have any suggestions on how to improve that next time?
I am trying your method today and realize that you don’t do any “kneading” time. Or did I miss that step somewhere? is it OK to skip that?
Watched yesterday and am making today!
Sir, my utmost respect, I really appreciate you!
OMG this bread came out just like you said it would. The best tasting bread I’ve ever made!! Thank you.😊👍❤️