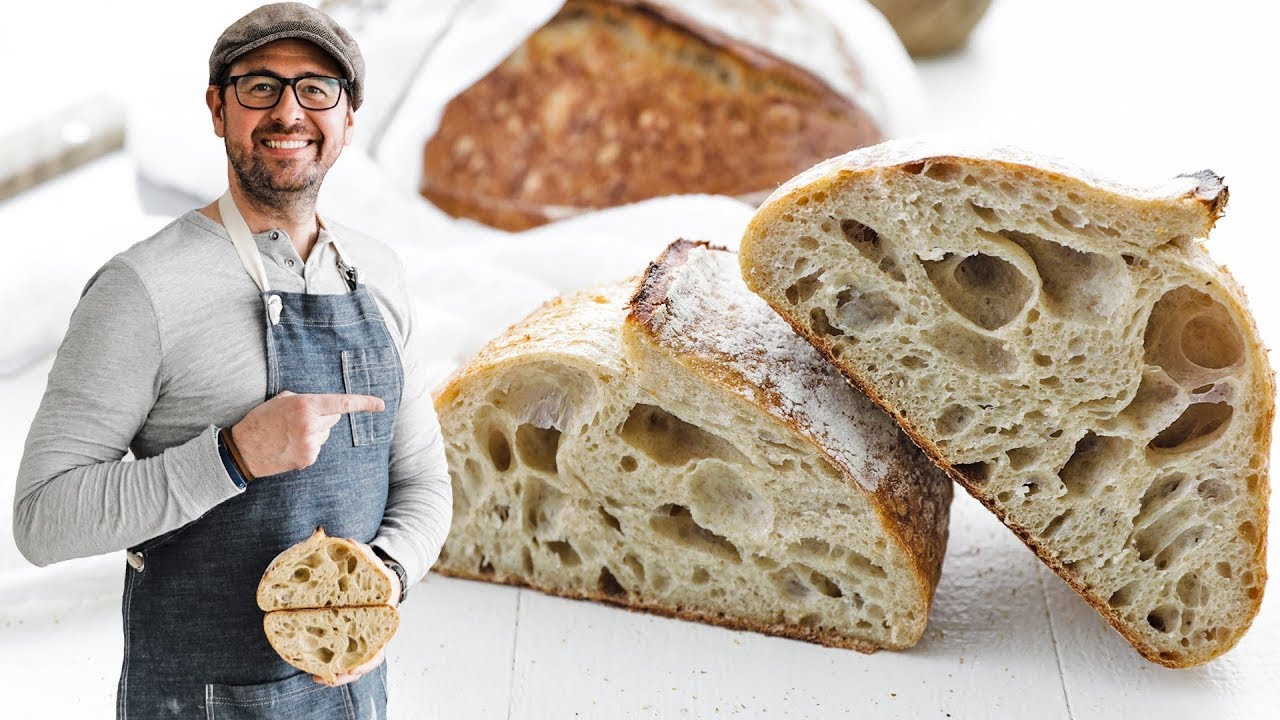
The Perfect Sourdough Bread Recipe

Learn how to make an absolutely delicious sourdough bread recipe every single time using my foolproof easy to follow steps using all-purpose flour. Subscribe ►
Affiliate links for tools used in this video:
Plastic containers for starter –
Bowls –
Scale –
Banneton –
Kitchen towel –
Challenger bread pan –
Bench Knife –
Hefty bags –
Bread scorer –
Resting rack –
Ingredients for this recipe:
For the Starter:
• 75 grams of active starter
• 55 grams all-purpose flour
• 20 grams whole wheat flour
• 75 grams warm water
For the Bread:
• 350 grams all-purpose flour
• 50 grams whole wheat flour
• 75 grams fed starter
• 14 grams sea salt
• 275 grams warm water + extra for dipping
Makes 1 Loaf
Prep Time: 20 minutes
Bake Time: 35 minutes
Cooling Time: 45 minutes
Resting Time: 20 1/2 hours
1. Feed your starter & place in a warm place for 4 hours or until it has at least doubled in size & is beginning to fall. (See chef notes below)
2. Once the starter begins to fall being the autolyse process by mixing together your flour & filtered water. Cover with a damp towel & place it in the oven next to your starter & autolyse for 30 minutes.
3. Add your starter to the dough & mix in, which takes about 90 seconds. Cover with a damp towel & place it in the oven next to your starter & autolyse for 30 minutes.
4. Measure out and add the salt to the dough, wet your hands with bottled water, and mix it in until combined, which takes about 90 seconds. Cover with a damp towel and place it in the oven next to your starter and autolyse for 60 minutes.
5. Perform a series of folds to the dough for about 90 to 120 seconds to strengthen the gluten in the dough so that it will eventually hold shape. Cover with a damp towel and place it in the oven next to your starter and autolyse for 60 minutes and repeat this process 3 more times.
6. After the last fold to the dough Cover with a damp towel and place it in the oven next to your starter and autolyse for only 30 minutes this time.
7. Remove the dough and place it directly on your countertop. Rub a little flour to the top using your hand and curl in the bottom of it using a bench knife to make it taught and tight on top.
8. Flip the dough over and stretch out as much as you can to a rectangle shape. Fold the right side to the left side over to cover about 2/3 of the dough. Now fold the left side as much as you can over the right side. Starting from the bottom roll up the dough to the front pulling gently making it as taught and as tight as possible.
9. Transfer the dough seam side up into a lightly floured banneton and pinch together the seams to help create more air pockets in the bread and to aid in the rising process.
10. Cover in plastic, a towel, or in a large plastic zip bag and refrigerate for 12-16 hours or up to 24 hours.
11. The next morning, preheat your pan in the oven at 500° for 30 minutes.
12. Next, quickly sprinkle cornmeal into the bottom of the pan. In addition, take the dough out of the fridge and sprinkle cornmeal to the top of the dough just to make sure it doesn’t stick.
13. Immediately flip the dough in the banneton over to the center of the hot pan and score the bread using a razor, sharp knife or bread knife.
14. Place the lid onto the pan and bake for 20 minutes.
15. Remove the lid and bake for 15 more minutes to help with brown the bread and cool on a rack to room temperature.
Chef Notes:
The water temperature should be between 30-33° C or 87-93° F and can be warmed up in a pot or in the microwave.
I measured the salt at 2% of the entire flour and water weight, I did not use normal bakers percentage which starts at 100% flour, just as an FYI.
Yes, you can use bread flour, or any kind of flour for your starter, I probably spoke a bit too harshly there. Those other flours can be expensive, they’re hard to find right now and the hydration percentage is different and would need to be tweaked.
How to Store: Store this bread wrapped in parchment paper and keep at room temperature for up to 4 days. You can cover and keep in the refrigerator for up to 7 days.
To make a proofing environment if you don’t have a bread proofer, simply turn the light on in your oven and leave the door cracked. It will be between 78° and 84° in there which is perfect.
You will know when it’s time to begin the autolyse process when your starter begins to fall from its peak volume.
It’s important to use filtered water in making bread as too much chlorine in tap water will kill the starter.
The reason for using all-purpose flour in the recipe is because it is more commonly used and acquired in households.
If you want to use bread flour instead, increase the amount of water by 5%
source


![10 Beefy Keto Recipes [Low-Carb Meals Featuring Beef]](https://amazingfoodstv.com/wp-content/uploads/2022/12/1671501647_maxresdefault-768x432.jpg)
Can i use Spelt and Teff flours to make Starter & Sourdough Bread?
Also, what can i use instead of Yeast ?
Thanks for your recipe. When the bread is taken out of the fridge after 8-12 hours, should it be brought to room temperature b4 baking it?
Chef Billy, thank you so much for your videos and tips! I appreciate all that you do to help non-professionals like me create something we can be proud of. Your sourdough starter (reduced to 1/6th as you suggested) and bread recipes were well-explained and easy to follow. I just need to lower the temperature of my oven next time.
Update: I got a beautiful loaf! I took the lid off and it looks amazing so far! I believe my last loaf was overprooved. I had possibly waited too long to bake it and it may have collapsed. It still tasted good though.:)
Question: I made this recipe and it was pretty flat. Maybe I didn’t score it right but that shouldn’t have made a difference. I had used bread flour, but I did add the right amount of water to it (again that should not have made a difference.) My question is, we don’t proof it after shaping. Isn’t that step necessary?? My dough did nothing in the fridge, it seemed to shrink rather than proof. It’s not that cold in the fridge but it was as nothing happened and no cold proofing took place. I believe that was the problem.
Yay! It worked! Next im going to try a garlic sourdough!
Tanks vary mach
can i bake it in ninja foodie?
Very good video! I skip autolyse (especially with 100% AP or bread flour). I’ve never seen a difference. I mix my starter with most of my water (keeping some for salt). Starter floats, mix well, add to flour. This way, the mixing is easier and not as sticky. Wait 30, add salt and remaining water (I like 70-75% hydration). Folds every 30 3X and then let bulk for about 2-3h at 27C. pre-shape, wait 20-25 then shape. Sourdough bread making is addicting and satisfying!! Enjoy!!
why do you need to feed the starter with all purpose flour instead of bread flour?
Oh my goodness… I followed your steps to the g’s. Just pulled it out of the oven, it’s just about perfect!!… first time 😊
Thank you Chef!
I like his starter. It's working for me. Thank you.
Why do they all use grams, we use Lbs and OZs in the Continental United States Of America, I am clueless😞
Am a beginner, seen many videos on starters and bread making for two weeks…you are my pick, seems simple and to the point….not a long video or too much chatter!
I thank you for this!! 👌🏻🫶🏻
Hello what is the temperature for autolyse for the 30 min ? When the oven is slightly open.
Chef Billy – any adjustments to the recipe if I am going to use steam oven with 230 Celsius (~470 F) temp max on a scale?
I didn’t do so well this first time out. Working with whole wheat is always my Achilles Heel when baking bread :(. I’m not sure why that is but it always comes out heavy and dense. Rise was good but could have been better. The only thing I did differently is use filtered water instead of bottled water. It also burned on the bottom, so I think I’ll have to try again with less wheat flour and more APF and reduced temp to 450.
I am new to baking. My sourdough starter has raised to a level and it dropped a little bit. Why it is happening. What was wrong.
Can I use the leftover starter for another loaf or two or do I feed this starter all over again or start with new fed starter. Since we only used 75 gms. Thank you for sharing .
That is a great looking loaf, especially for a rookie baker. C’mon, you had a consultant!
I think AP flour makes the best bread. Been doing it for years
You’ll have an easier time with the folds if you wet your hands first. No sticking
Can you double the recipe for 2 sour dough? When do you break it into 2 sour dough?
Followed the 5 day starter recipe and it’s not raising.😭😭 I’m about to throw some of the store bought yeast in the mix and pretend I did it right.
I'm looking for the Challenger Breadware dutch oven and so far, only gotten a scam. Any ideas on where/how I can purchase? Thanks for your help
Just baked mine…
That video is sick
Hi, can I double this recipe to make two loaves?
Um…why cant you use bread flour to feed a sourdough starter? I use bread flour to feed mine and it's totally fine. Actually, even when making a sourdough starter, bread flour is hands down the best to use. But even continued feedings – bread flour is totally fine.
Also you dont mention how hydrated your sourdough starter is, yet you mention hydration for the recipe. So I assume that you are assuming everyone feeds their starter at 1:1 ratio.
Beautiful bread, I’m curious why you say to only use AP flour to feed your starter. There a starters that use everything from 100% rye to whole wheat and even blends of flours. Just trying to educate myself more on the science of bread baking. Thanks!
Let's get this bread
My dough is too sticky to do this folding over technique, I don't know how to remedy this issue
You mentioned about only using AP flour when feeding a starter, but in your starter video you were using whole wheat flour. What’s the difference?
Do you room temp the dough before baking since it’s been in the fridge? Or can it be baked while still cold?
hi, do I need to use whole weat flour pls reply I'm making this tomorrow, thank you!
Thank you so much for recipe , my first sourdough bread turn out so goooood ❤️❤️ I love your Chanel 😍😍😍😍
Finished my bread a few hours ago. I give myself a grade of C-. Starter was doubled, looked good. Used filtered water. After the autolyse time I added the starter. Every subsequent folding going forward, my dough remained sticky and hard to handle. I added a little flour in the last two folds, but still sticky. My new Lodge Dutch Oven worked great. I got 3 big air pockets towards the top but bottom 2/3 of loaf was very dense. Flavor is good. Chef Parisi, would my lack of folding experience be the problem? Felt I was careful adding correct amount of ingredients, maybe not?
Uggghh!!! Fail – I followed your recipe/techniques to a tee! I was so excited, because the dough was “perfect”! So I thought. Took it out of the oven after 25 mins, uncovered and pure disappointment..it did not rise. Any tips or idea of what happened, would be most welcomed! I’m not giving up!
are you related to mathew james duffy?
This recipe is so helpful for me, absolutely the beginner I making Sourdough starter and bread! It came out perfectly with the first try! Easy to follow and I think the steps are precise! Thank you Chef!
It was delicious and gorgeous! Thank you