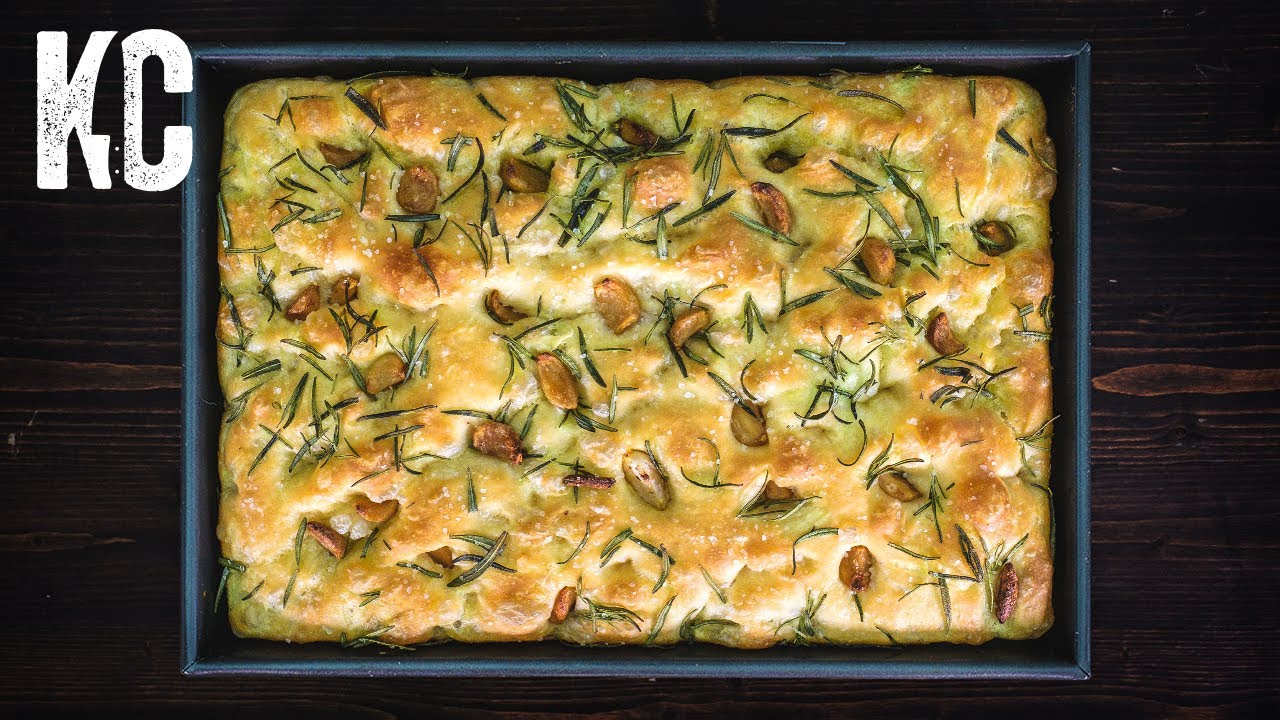
AMAZING FOCACCIA BREAD | How to Make it in 6 Easy Steps

Italian focaccia bread is a fantastic gateway to the the world of bread making. This recipe simplifies the dough making process, step-by-step, in a way that’s easy to understand. The results are truly amazing.
🔗 LINKS
Buy me a coffee! –
Instagram –
Website:
–––––––––––––––––––––––––––––––––––––––
❤️ OTHER VIDEOS YOU’LL ENJOY
Detroit-Style Pan Pizza –
Neapolitan-Style Pizza in the Ooni Pro Oven –
Foolproof English Muffin Recipe –
–––––––––––––––––––––––––––––––––––––––
GARLIC AND ROSEMARY FOCACCIA DOUGH
(makes one 9″x13″ bread)
All-Purpose Flour, 100% – 600g (4 1/2 Cups)
Warm Water, 75% – 450g (2 Cups)
Coarse Sea Salt, 1% – 6g (3/4 tsp.)
Extra Virgin Olive Oil, 3.3% – 20g (2 tbsp.)
Active Dry Yeast, 0.15% – 1/4 tsp. (Instant is good too or 4-5g fresh yeast)
TO TOP THE DOUGH
Garlic Confit, as needed
Fresh Rosemary, as needed
Coarse Sea Salt, as needed
–––––––––––––––––––––––––––––––––––––––
EQUIPMENT THAT I USE (Affiliate Links)
9″x13″ Non-Stick Pan –
Chef Works Uptown Apron –
Chef Works Denver Apron –
Lloyd’s Pans Straight-Sided Pizza Pan 12×1 –
Lloyd’s Pans Straight-Sided Pizza Pan 10×1 –
9″x13″ Non-Stick Pan –
Cast Iron Tortilla Press –
Lodge 12″ Cast Iron Pan –
Lodge Cast Iron Griddle (10″ x 20″) –
Tojiro DP Utility/ Petty Knife –
Mac 6″ Curved Boning Knife –
KitchenAid Pro Line 7 Qt. Stand Mixer –
KitchenAid Pasta Roller Attachments –
Cuisinart 14 Cup Food Processor –
Gas Burner Attachment for Ooni 3 Pizza Oven –
Pasta alla Chitarra Pasta Cutter with Rolling Pin –
Gnocchi Rolling Board –
All-Clad Stainless Steel 7 Qt. Pasta Pot with Strainer –
All-Clad Stainless Steel 10″ Fry Pan –
All-Clad Stainless Steel 14″ Fry Pan –
All-Clad Stainless Steel 1.5 Qt. Sauce Pot –
Le Creuset Enameled 11.75″ Cast Iron Skillet –
Fujifilm X-H1 Mirrorless Camera –
Fujifilm 35mm f1.4 Lens –
Fujifilm 18mm f2 Lens –
Fujifilm 16-55mm f2.8 Zoom Lens –
Joby Gorilla Pod 5K Tripod –
–––––––––––––––––––––––––––––––––––––––
TIMESTAMPS
Intro – 00:00
Why Focaccia is great for beginners – 00:11
Mixing the Focaccia dough – 00:55
Why folding dough makes great bread – 02:37
Folding the Focaccia dough– 02:52
First Fermentation – 03:21
Cold Fermentation – 03:38
Placing Focaccia dough in pan – 03:58
Final proof & dimpling the dough – 05:01
Topping the Focaccia – 06:22
Baking the focaccia – 07:06
Cutting the focaccia – 07:43
Outro – 08:15
(Non-Affiliate Links)
Anryu Kurouchi Gyuto 240mm –
#focaccia #kitchenandcraft
source
(1) Mix (2) Fold/Knead (3) Bulk Ferment (4) Proof (5 )Dimple (6) Bake. That's it! So what do you think? Will you give this recipe a try?
Great recipe. Novice mistake I made. My garlic gloves were really round and fat so I sliced them in half. When I con-fitted them they started to seperate. Left them in the fridge over night in the olive oil and they swelled up a bit, so should be ok. Next time I’ll leave them whole. Happy baking everyone
Gonna try this one this coming christmas. Thanks🙏
I made this…. except I skipped the toppings and shaped them(as much as I could) into dinner rolls instead. And i gotta say these were the most soft and tasty dinner rolls ever , even when eaten 2 days later. My previous dinner rolls recipe required lesser water and so even though my dinner rolls would be soft on day 1, they would get dry and dense the next day…I guess its the amount of water added to the dough in your recipe that did the trick for me. Thank you I learnt something new!! And next time I will make sure to actaully make the " Foccacia" bread 😅
Tried it-Total success- cheers👏
Hi! Where did you get the wooden bowl? Any way you can add the link? Thanks!
I have watched umpteen focaccia videos and tried a lot of them but yours delivers every time. Thank you.
In England, it is hard to find focaccia outside London so I turn to you for inspiration and the results are amazing.
I do incorporate one ingredient however which I used from another video, I put 2 tablespoons of runny honey in my dough mix which gives it extra bounce and richness.
I don't know your name, but thank you once again, your video is succinct, easy to follow and you don't have an annoying voice like so many others haha.
Simon in Kent UK
Good morning, I hope you get a chance to read this comment, let me start off by saying I turned 67 years old Saturday, I have always wanted to make homemade bread but never really took the plunge. My wife’s youngest daughter is an incredible baker breads cakes, I have been begging her to teach me to make focaccia for quite some time, to no avail so I am so happy that I found this Recipe at your YouTube channel. I figured I would celebrate my birthday by making this which by the way it came out amazing I did everything that you explained and my dough after 18 hours in the fridge was almost tripled in size easily went into a 9 x 13 pan. I followed your steps precisely, I topped it with cherry tomatoes halves, Kalamata olives and garlic confit. Thank you for taking the time and the patience to explain this at a comfortable Pace, and answering everybody’s potential questions before they were asked. You’re an awesome guy and I plan on watching more of your videos. I wish I could post a picture here of what the bread looked like because it was just pure heaven thank you again brother God bless you.
Liked, shared and subscribed…thank you so much. You’re amazing
Mine stuck to the bottom but managed to get it out with brute force, any trouble shooting tips for next time? Turned out delicious 😋
مفيش ترجمه ليه
This made the most fluffy yet crisp bread. I topped with cheese and jalapeños. My family went crazy for it.
I love this recipe. However, I need some clarification. In your video you use a 9 X 13 inch pan. On your written instructions you mention using an 11 X 13 inch pan. Please clarify.
Nice job, 1/4 tsp of yeast, really; and you get that height?
My favorite bread but it's expensive .
That looks fucking amazing.
Made this today after a night in the fridge. FANTASTIC!! CHEERS.
First time I made focaccia , it turned Very nice! Thanks so much for your wonderful recipe and instruction! Bdw, wondering if facaccia will be nice with addition of oats flour? Is there any chance of showing Focaccia made with oats ? Looking forward… and Thanks so much again..
Just a note from an old timer. I've been making all sorts of bread doughs in restaurants for the past 40 years and training newbies how. I can say without fear of contradiction; although some of my procedures are minorly different; that your explanation, procedure, and tips are nothing shy of excellent!!! I can't imagine anyone blowing this recipe… It is nothing shy of excellent AND it tastes damn good… Good Work!
How many salt u used?
Oh i totally believe in not over working my dough
We love this recipe and your approach and style in sharing it. We attempted to recreate it and the dough did not rise. We felt like we followed your excellent recipe to the T. Is it possible that the yeast did not work. We had the yeast bag for 3 years sitting in our pantry. Would that have affected the outcome?
Me gusta la focaccia y tu la preparas excelente! <3 <3 <3
Tried your recipe, amazing results… thank you
it looks like a very long process.
I just baked this and it turned out perfectly apart from the garlic cloves, they burnt and tasted bitter. Not sure what I did wrong there.
pls help can i bake it in a ceramic baking pan??
hi and thank you so much!! if i were to want to stick cherry tomatoes and olives into the dough- would i do that before the second proof in the lighted oven or after? ty
as a beginner cook i made this bread and everyone has loved specifically my vegetarian mom
👌👌👌very clearly explained and it’s so yummy ❤️
Can i keep my proofed dough out in the open till the morning my fridge is out of order
I followed the recipe, the directions and the outcome was amazing! Thank you for taking the mystery out of bread making for me!
Greetings from Thailand Tim. Thanks so much for the instruction. I tried my first focaccia and it came out great!
😍😍😍😍👌👌👌Good job
Had beginners luck with this recipe, but have a question. Why does the salt go into the warm water? Couldn't it be mixed in with the flower and yeast instead?
is it worth making this in a pizza oven? Any benefits?
Really want to start the process today, can I bake it in cast iron Pan?
How come you don't place the oil on the top when you dimple it like other bakers do. I have never seen anyone use water.
From UK 🇬🇧 thank you I'm going to try this.
I can't wait to try this recipe! I'm thinking with a big fat vat of homemade chilli…..🙂
Made this so many times.. And everytime a hit! Been watching alot of focaccia baking channels and yours is the best!
Hello! Tried your recipe twice now, first one went very well, but the second one didnt seem to rise in the cold fermentation stage, fridge was set to a very low temperature could that be a reason?
I've made this recipe three times now with a high level of consistency. I like the bread out of the oven to be crisp on the outside, so I don't pour more olive oil on it at the end. We can dip the bread in olive oil and herbs if desired.
What do I change if I use a 12 inch cast iron skillet?
I think this recipe needs just one more little splash of olive oil! Other than the fat content, its great!
Same background music from alt coin daily channel
Man! This is all-day process
Really appreciate the additional details (Water temperature, exact flour measurements, dough folding methods, description about the yeast and the 'wet' finger to dough method). I have used and Bookmarked this recipe and make this bread at least once a month. Thank you for the specific details and, your great enthusiasm describing the preparation of such a wonderful meal staple!. THANK YOU! I am truly inspired!
What the measurements if you don't have a scale?