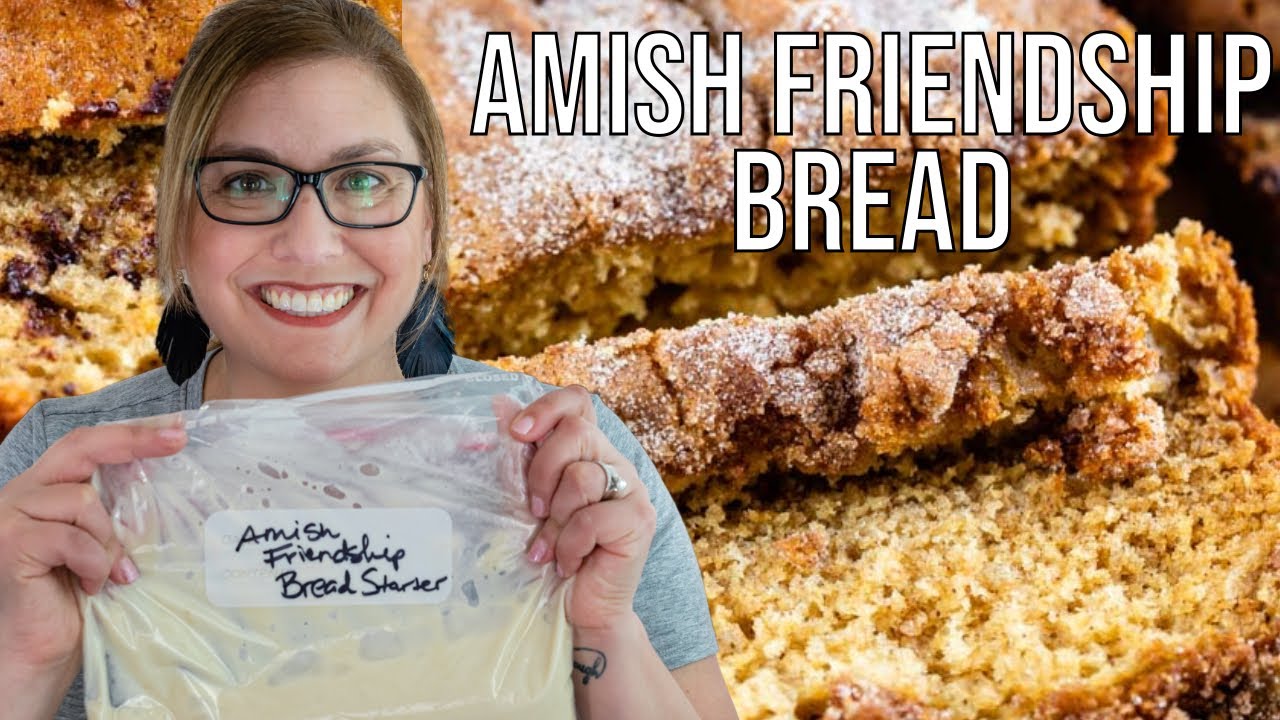
Amish Friendship Bread Recipe + How to make Starter

Learn how to make Amish Friendship Bread Starter, how to grow it and make the bread, then how to share it with friends! This easy starter is so much fun to grow and the bread is SO good!
PRINTABLE RECIPE:
Click through to the post to get a printable resource to share with friends on the sharing day!
INGREDIENTS
STARTER
1 package active dry yeast 2 1/4 teaspoons
1/4 cup warm water 110°F
1 cup granulated sugar
1 cup all-purpose flour
1 cup milk (nonfat, regular or 2%)
FEEDINGS (2)
2 cups granulated sugar divided
2 cups all-purpose flour divided
2 cups milk divided (non-fat okay)
FOR THE BREAD:
1 1/4 teaspoons baking powder
1 teaspoon baking soda
1/2 teaspoon salt
1 teaspoon cinnamon
2 cups all-purpose flour
1 cup starter
2/3 cup oil
1 cup granulated sugar
3 eggs
1 teaspoon vanilla
Nuts, chocolate chips, or cinnamon sugar optional (see note)
INSTRUCTIONS
NOTE: Do not use metal utensils, spoons, or bowls. Do not refrigerate starter.
DAY 1: MAKE YOUR STARTER
Make your starter: Stir yeast into warm water. Let sit for 10 minutes.
Stir sugar and flour in a large bowl. Stir in milk until mixture is smooth.
Stir the yeast mixture into the flour mixture. Cover loosely and store on the counter.
Optional: place mixture in a gallon size ziploc bag and seal, releasing all the air. Store on counter.
DAYS 2-4
Stir the mixture once per day, or mash the bag if you’re using a bag.
DAY 5: FEEDING #1
Feed the mixture: Stir 1 cup each sugar, flour, and milk into the starter. Cover loosely and store on the counter. (If your mixture is in a bag, just add the ingredients to the bag and mash until they are incorporated.)
DAYS 6-9
Stir the mixture once per day, or mash the bag if you’re using a bag.
DAY 10: FEEDING #2/BAKING/GIFTING
Feed the mixture: Stir 1 cup each sugar, flour, and milk into the starter. Cover loosely and store on the counter. (If your mixture is in a bag, just add the ingredients to the bag and mash until they are incorporated.)
Reserve 1 cup of starter to continue growing on your counter. Consider today (Day 10) to be Day 1, and repeat these instructions starting with Day 2 tomorrow.
Remove 1 cup of starter to use in the Amish Friendship Bread Recipe (see directions below).
For gifting: Measure out 1 cup of remaining starter and place in a new gallon size ziploc bag (or bowl for gifting). Repeat with a second 1 cup starter. You may have an additional 1 cup of starter, which you can place in a third bag to give OR you can make a second batch of the bread (recipe below). You can also freeze this 1 cup of starter to use in the future (freeze in a gallon size bag).
FRIENDSHIP BREAD RECIPE:
Preheat oven to 325°F. Grease pan(s) with butter or shortening or spray with nonstick baking spray (the cooking spray that comes with flour in it).
Stir baking soda, baking powder, salt, cinnamon, and flour in a medium bowl. Set aside.
Stir starter, oil, and 1 cup sugar with a wooden spoon or spatula. Stir in eggs, 1 at a time, then stir in vanilla. Gently fold in dry ingredients. Stir in chocolate chips or nuts, if using (see note).
Place batter in pan(s). Optionally, you can sprinkle with cinnamon sugar (see note).
Bake according to your pan size below, until a toothpick comes out clean. Cool before removing from pan.
Pan sizes:
Two 4×8-inch or two 9×5-inch loaf pans: 40-50 minutes
One 10.5×16-inch loaf pan: 50-60 minutes
RECIPE NOTES
PAN SIZES:
Check your pan sizes. If your loaf pans are 4×8-inch or 9×5-inch, make two loaves. If your loaf pan is 10.5×16-inches, you can make one loaf.
You can also use ONE 9-inch square or 9-inch round cake pan instead of the loaf pans.
OPTIONAL FILLINGS/TOPPINGS:
Add 1 cup chocolate chips or nuts to the batter.
If you’re making two loaves, you can divide the batter in half and use 1/2 cup of either chocolate chips or nuts per loaf.
I love topping the loaves with a mixture of cinnamon sugar before baking (1 tablespoon granulated sugar + 1/2 teaspoon cinnamon)
YEAST:
You can substitute instant yeast if needed, just heat your water to 120-130°.
Subscribe to my channel
VISIT MY BLOG FOR ALL RECIPES!
Crazy for Crust is a recipe site full of easy and attainable recipes. Recipes are sometimes savory, mostly sweet, and always served with a slice of life.
CRAZY FOR CRUST – I’m Dorothy and I love food: eating it, baking it, and sharing it. I love teaching you to cook and bake my favorite recipes easily so that you can make memories with your friends and family. I’m a home baker – if I can do it so can you! Subscribe to get my recipes: they’re sometimes savory, often sweet and always served with a slice of my life.
YOU CAN FIND AND FOLLOW ME ON SOCIAL MEDIA: @CRAZYFORCRUST
BLOG: crazyforcrust.com
FACEBOOK: facebook.com/crazyforcrust
PINTEREST: pinterest.com/crazyforcrust
INSTAGRAM: instagram.com/crazyforcrust
TWITTER: twitter.com/crazyforcrust
source


Thank you I share this video with my family I used to make this years ago I forgot about it and then when I remembered it I was looking for a video and I found you❤
my mom would make something like this, and she called it something else and there are some differences. The part that made it fun for kids was getting to mash in a banana in the starter yeast, and she didnt keep it in a bowl. It was in a zip loc bag that you would nead by hand and keep in a dark place Cabinet/drawer, where ever. I am going to try this and see if this is it, and share the starter with my mom, I know it would make her happy.
I've been searching for this exact recipe from the 80's. I always see the sour dough one. Thank you so much! I'm looking for the written out recipe, where can I find it?
Where do I find it written out?
I made this years ago. We passed it around in Royal.
So glad i came across this. It's been 20 plus years since iv had this, and I never knew how to do the starter… Thank you.
Video too long. Please make a short edited versuon
I remember this one but also one we called "Herman" he had fruit cocktail pears and? Added for first 5 days. Would love to have that recipe again also
Did you just cover yours with the dish towel for the whole time or did you have a lid on your bowl?
I'm ready now thank you.
I haven't thought about Friendship bread in decades. Yes, everyone had it & shared the starter around. It was a great gift in a cute mason jar. Just watching you make it – I can smell it – the dough – nothing else smells like it We didn't call it Amish it was just Friendship bread
I was just gifted my first starter today…im so excited
I had a friend of mine gave me a loaf one year I prepared it and it was awesome I'm so glad and looking through YouTube and I caught you making it or you made my day and yes I did subscribe I didn't want to lose you
Love this!! Such wonderful memories this brings back❤️ I was craving it out of nowhere and it’s a perfect fall recipe! Thank you much🙏🏻
Thank you for the video and recipe. Have you tried baking this as cupcakes, or as a sheet cake? Also, has anyone tried substituting honey for sugar at any point in the nurturing and/or baking processes? I'll be experimenting with substitutions like honey or date syrup for sugar, abd applesauce for oil… I'll strive to let yall know how that goes.
Why would you need yeast in there? You make sweet sourdough when you ferment it on the counter, so what is the yeast for????
Ms. Anderson at Ponderosa elementary school in Sunnyvale, CA. She would bring our class a loaf every other week. Thank you!
Man my mom and Daddy used to make this all the time!!!
I am on day two and so excited to start baking
Myyy momma would make this!❤❤❤ when she passed there went the recipe 😢 but i found it through uuu🥹🥹🥹❤❤❤❤ i cant wait to make some!!! Im so excited loll
Awesome I will try. Its been such a long time I made Aamish bread. Thank you for the wonderful recipe
Yes I remember
you can use 1 package of banana pudding jell-o also to flavor the bread to taste like banana bread.
Tomorrow will be day 10 and I’m wondering if there’s a way to keep
The starter alive without baking all
The time. For
Example, I feed my sourdough starter and then store it in the fridge until I need to bake like 1x per week and then take it
Out feed it and bake. Been doing this for 7 years now. Thanks for posting this recipe it was so easy to
Make.
Looks delicious
Can I use almond milk and do I need so much sugar?
This was a HUGE craze in Hawaii (Oahu) when I lived there. Haven’t heard anything of it in years. Sad. Thus was a lot of fun.
How long to bake and temperature?