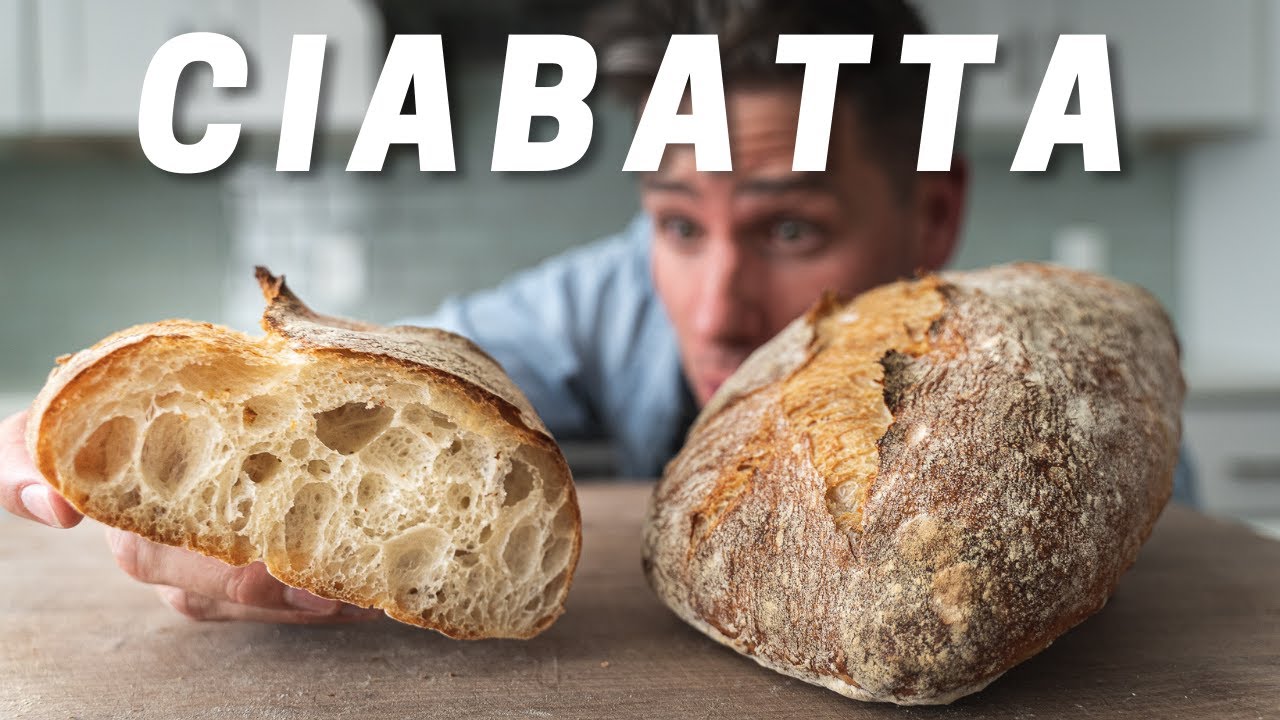
CIABATTA (Crispy Crust✔️ Silky Open Crumb✔️ Biga ✔️)

If you’re into baking bread, knowing how to make great ciabatta is a must. You just can’t go wrong with the classic crispy crust and silky open crumb of this loaf. Make it in into a classy sandwich or just eat the whole thing by itself for fun. I won’t judge you.
☕Enjoy this content and want to show support? Consider buying me a “coffee” here:
📸INSTAGRAM:
🔪MY GEAR
BOOS BLOCK CUTTING BOARD:
BREAD KNIFE:
BAKING STEEL:
PLASTIC DOUGH CARD:
ESCALI DIGITAL SCALE:
KITCHEN AID MIXER:
LODGE CAST IRON SKILLET:
MY FAV STAINLESS BOWL:
HALF SHEET TRAY + RACK:
RECIPE
BIGA
•175g or 3/4c warm water (86F/30C)
•1/4tsp instant yeast
•225g or 1 1/2c AP flour (11.7% protein)
Add water, yeast, and flour into a high sided container and mix until no dry clumps of flour remains. Let ferment at room temp for 6-24 hours.
AUTOLYSE
•180g or 3/4c warm water (86F/30C)
•250g or 2c AP flour (11.7% protein)
Into bowl of a stand mixer fitted with a dough hook, mix your Autolyse (water and flour) on low until combined. Cover with town and let sit for 30 minutes.
FINAL MIX
•40g or 2 3/4Tbsp warm water (86F/30C)
•5g or 2tsp instant yeast
•10g 1 3/4tsp salt
•All of the biga you mixed earlier
For your final mix, add warm water, yeast, salt, and biga to your autolyse and mix on low for 3 minutes. Increase speed to high and mix for 5 more minutes. When dough is mixed enough it should clear the bowl and begin to get shiny.
FERMENTING AND SHAPING
Transfer dough to an oiled bowl. Cover and ferment at room temperature for 30 min. Do strength building fold as shown @3:33. Cover again and let sit at room temp for another 30 minutes. Laminate dough as shown @4:27 (this takes the place of a 2nd stretch and fold). After laminating, transfer back to bowl seam side down, cover and allow to ferment at room temp for 1 hour. Dough should be gassy and alive at this point.
Liberally flour work surface and dough well. Use dough card to release dough from bowl as completely as possible before transferring dough to work surface. Gently pat into a square slab.
Prepare a piece of parchment that’s larger than your slab of ciabatta dough by liberally flouring it. Cut dough into two equal rectangles and gently transfer to floured parchment. Cover and proof at room temp for 30 min.
BAKING
Preheat oven to 500F/260c – I also preheat my baking steel/stone on the middle rack and a cast iron pan in the bottom of my oven.
Boil water.
Slide ciabatta onto baking steel and pour boiling water into cast iron pan in the oven. Cover loaves with turkey pan, decrease heat to 480F/248C and bake for 12 min. Remove foil pan and continue to bake for 13-15 minutes until crust is a deep golden brown.
Cool on wire rack.
#ciabatta #ciabattaloaf #ciabattabread
|| MUSIC ||
––––––––––––––––––––––––––––––
bensound.com
––––––––––––––––––––––––––––––
**DISCLAIMER: Some links in this description may be affiliate links. If you buy any of these products using these links I’ll receive a small commission at no added cost to you. All links are to products that I actually use or recommend. Thank you in advance for your support!
source


Do you use two side baking regime or just one side ?
Great Ciabatta.. the mixer version has a much better looking crust..
I bought an Anova oven for Sous Vide and to make incredible bread (so they say). These look great but seem like very time consuming which I don't have. Any recipe out there that you mix once, let it rise, and bake? I can control the humidity so I know that's important but I'm still learning.
Thank you for doing a version of this WITHOUT the mixer, for us bakers on a budget 😌👩🏾🍳
That is a beautiful ciabatta loaf… I almost ate my laptop… I was so submerged in the video.
What am I doing wrong?? After mixing for 5 minutes on high, my dough never forms a ball and clears the bowl. I have made this recipe a few times and always the same. I have tried mixing it for a few minutes longer and added more flour (not too much, afraid to dry it out too much). I weigh all the ingredients. The end result is still pretty good, but my dough is still a sticky mess after the 5 minutes.
Hi there,
Do you suffer from verbal diarrhea by any chance?
This was extremely easy to follow for an amazing result.
First time watching any of your videos and WOW! You’re freaking amazing!!! love, Love, LOVE! Not to mention the sweet chibby dancing at the end!😂 I’m hooked!!
Sub-SCRIBED.
🙏💜💜💜💜💜💜
Hi Brian, used your recipe twice now and the bread was fantastic. Made one small ingredient addition added 1 tsp sugar. Any comments Brian
I made this bread today and it turned out just amazing, open crumb, very soft with a crunchy crust, i really want to thank you for sharing this recipe with important details 😇😍🙏
LOVE this video! So easy to follow and the bread is unreal!
That actually take three to make
I am almost pro baker in Danmark and what can I say about Your videos, it is awesome! Very clear explanations, a LOT of information, super nice recipes! Very appreciate that You are demonstrating both ways of how to knead the dough, it can be very helpful to people.
"auto-lyse" is greek for "self-decomposition". That does not say anything about mixing flour and water…
It means that enzymes in the flour start breaking down proteins in the flour which improves certain properties of the dough. That process is initiated when you add water to the flour.
I find it extremely important to explain to people WHY sth. is a good thing to do or should be done. Otherwise I for example will always take shortcuts until I learn by mistake – which is exactly what you try to spare people with these videos
Hey BRI….I nailed this mutha! I’m stoked to actually be baking. All because of you. Thanks for the education muh dude. 🤘
Looks great!
its ciabatta not cibata
I don't have a pizza stone or a cast iron, are there any alternatives that can be used/bought for cheap ? (I know someone is going to tell me to get a cast iron lol I'm not a fan of em)
Brilliant!
Has anyone tried making individual sandwich rolls with this recipe instead of two large loaves? If so how many and how did they turn out?
5:08 T REX ARMS!
oops left caps lock on
but in all seriousness, you did NOT lame the mixer made batch?
Can we use wheat flour for both biga and main bread dough
Why didn’t you use bread flour?
Never baked anything in my life, but I am sick and tired of eating bad bread… But then, there is art and skill in everything and I will try UNTIL I get it right. I do not care if I have to lay waste to my kitchen. Good bread only last 2-3 days. So I have to do this every 2-3 days. One can easy see, that making your own bread is a huge investment in time, but what is the option? There are no bakers or bakeries anymore where I live (Houston, Tx) So it is this or starve to death… I will never eat sponge bread again !!!
Elasticity and extensibility are not the same thing. Extensibility refers to a dough's ability to stretch without tearing. Elasticity refers to a dough's tendency to contract back to its former shape after stretching.
I have tried many ciabatta recipes over the years and although most were good, this one from Brian Lagerstrom is EXCEPTIONAL! I got the most fluffiest tender tastiest Ciabatta EVER. The tips Brian shared was a game changer.i don't even have a stand mixer. Used my handheld mixer and the dough hook. Also did not use the roasting pan to lock in steam. Nonetheless, came out PERFECT. Cant wait to try more recipes. thank you!!
My Favorite Bread. Making this for Thanksgiving. Thank you for this Recipe!
Yeah right, guy’s just go & buy bread locally, no need for this bullsh*t!
3:16 “Extensibile”
i did everything as shown in the video and it didn't work for me. the dough became too sticky and runny, so I put it in the bin.
Wow. Definitely a very good one
this has become a weekly bread staple in my house now 😍 lately it’s been falling a bit flat I’m wondering if it’s the colder temps in my house that’s causing during the waiting periods…
I dont have turkish pen,what i can use in other case??
HELP! First time I made this I found the dough to be very wet and more like a batter – added a fair bit flour after the first 30min proof but it was still was more like a batter than a dough. Final product didn't turn out well but had an ok taste. Making this for the second time now, carefully measured all ingredients and followed each step exactly and still finding far too wet. Anyone else find this?
Many recipes that use an oven instruct to preheat to a certain temp. This recipe should preface with 'set aside a weekend.'
I was a baker for years and all of this is great info 👍🏻🤌🏻
Lots of unnecessary words and unnecessary movements. It's just bread.
I’ve made a lot of bread over the years but this ciabatta bread has the best crispy crust and rich flavor of all . And that’s with the biga developing for only 6 hours! Next time I’ll let it go the full 24. Can’t wait! Thanks Brian. Next up is the gooey Mac and cheese.
I am a home baker and tried countless ciabatta recipes both from books and online bakers. This recipe and tips from Brian is by far the most flavorful and best one I tried so far. Please keep the bread recipes coming!
I owned a cafe for ten years and a proper ciabatta was one of the things that made us so good
Man I glad I found this channel. I have a bread making cook book but this really helps me because I’m more of a visual learner. Everything you did was in the cook book but where I had questions you answered by showing me how it’s done. Thank you for that and keep up the good work! 🎉🎉🎉🎉
The video is great without doubt. But 1 kilogram of bread cost one 2 days of work! Not very efficient really. Sorry.