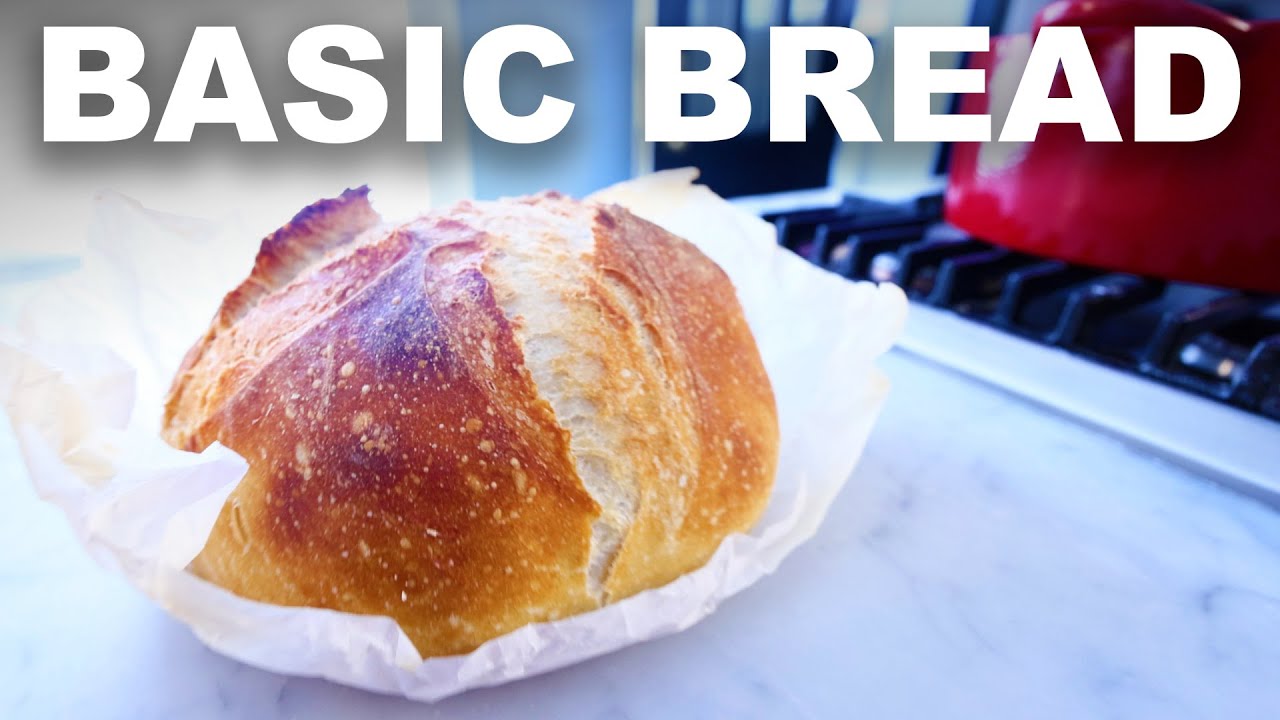
Homemade crusty loaf, with or without a dutch oven

Thanks to Magic Spoon for sponsoring this video! Use my code RAGUSEA to get $5 off your delicious, healthy Magic Spoon cereal by clicking this link:
***RECIPE***
2 cups (474mL) water, divided in two
2 teaspoons (10g) salt (based on the Morton Kosher I use)
1/8 teaspoon dry yeast (two small pinches)
bread flour (you’ll need maybe 5-6 cups, 500-600g, but this recipe is not based on firm quantities)
a little whole wheat flour, if you want (I like to replace maybe a tenth of the white bread flour with whole wheat — I just eyeball it)
The night before you want to bake, mix a poolish by combining half of the water (1 cup, 237mL) with the yeast and enough flour to get a thick batter / pudding consistency. I think a wooden spoon is the best utensil to use for this, but whatever spoon you use, use something rigid. You can just leave the spoon in the poolish overnight. Cover the poolish and let it ferment 8-24 hours.
About four hours before you want to bake, uncover the poolish and mix in the remaining cup (237mL) of water, salt, and as much flour as you can stir in with a spoon (no hand kneading). Again, you can leave the spoon in there. Cover and let rise/hydrate for about an hour.
Check it again and see if you can stir in a little more flour now that the previous addition has hydrated. When you’re done, you can get rid of the spoon. Cover and let rise/hydrate for another hour.
These next steps I do in the bowl, just to keep the mess contained, FYI. Sprinkle the dough with a little flour to keep it from sticking to you. Grab one side of it and pull it out until just before it’s going to tear, then fold it back in on itself. Rotate the dough 90 degrees and repeat until you’ve done this four total times. Position the dough so that the seems are on the bottom and the smooth surface is on top. Cover and let rest for about 20 minutes.
Do the whole folding and stretching procedure again, rest 20 minutes, and then do it a third time.
The following instructions are for baking this with a dutch oven. If you’re using a baking sheet with a heat-safe metal bowl, skip to that part now.
Get a sheet of parchment paper, crumple it up into a ball, un-crumple it and stuff it down into the bottom of your dutch oven. Transfer in the dough, smooth-side up. Cover the dutch oven (but not with the lid). Put the lid in your oven and get it heating to 500ºF/260ºC (some people get better results with slightly lower temperatures, but every oven is different). Let the dough proof for about a half hour while the oven heats up.
When the dough is looking puffy, score the surface — I find a few quick, confident slashes with a serrated knife work ok. Put the dutch oven over a burner on your stove, turn the heat on high, and cove it with the hot lid from the oven. When the side of the dutch oven feel hot (it should just take a couple minutes), transfer the whole situation to your oven and let bake for a half hour undisturbed, so as to not let any steam escape.
Carefully remove the hot lid, reduce the heat to 450ºF/230ºC and let the surface of the bread brown while the interior finishes baking, 10-20 more minutes. You can test the interior with a thermometer — anything in the neighborhood of 200ºF/93ºC is good. Let the bread cool before slicing.
The following instructions are for doing this with a baking sheet and a heat-safe metal bowl.
Line a baking sheet with parchment paper. After you’ve done the whole folding thing three times, position the dough on the baking sheet, smooth-side up. Cover it with a heat-safe metal bowl that’s big enough to not touch the dough as it rises and/or bakes. Get your oven heating to 500ºF/260ºC (some people get better results with slightly lower temperatures, but every oven is different). Let the dough proof for about a half hour while the oven heats up.
When the dough is looking puffy, score the surface — I find a few quick, confident slashes with a serrated knife work ok. Move the whole pan/bowl rig into the oven and let bake for a half hour undisturbed, so as to not let any steam escape.
Carefully remove the hot hot bowl. If your oven has a convection fan, turn it on. If not, just crank your oven to its highest temperature, if it can go any higher. Let the surface of the bread brown while the interior finishes baking, 10-20 more minutes. You can test the interior with a thermometer — anything in the neighborhood of 200ºF/93ºC is good. Let the bread cool before slicing.
source


Thanks to Magic Spoon for sponsoring this video and for helping me hit my macros in spite of all that bread! Use my code RAGUSEA to get $5 off your delicious, healthy Magic Spoon cereal by clicking this link: https://magicspoon.thld.co/ragusea_0422
Thanks a ton for this video! After several months of making flour bricks, I finally made a good, rustic bread with air cells. Go Hoosiers!
I AGREE!!! Go with your senses! I never measure when it comes to bread – ever.. 🤓👍🥖🍞❤️
My poolish didn't get nearly as large and as stretchy as yours did, and the finished bread turned out pretty dense. I'm thinking the yeast weren't active enough. Maybe my house was too cold? It was around 65° f inside. Anyone have advice?
Add a few ice cubes for more steam.
When needed I add moisture to my oven by adding a tray of water. The water steams off and greatly increases the humidity in the oven. This is a technique which can be used for any size or shape of loaf.
I just baked my second loaf of "basic bread" tonight. Wow, I never knew simple bread could taste so good! Thank you Adam for yet again another practical recipe that focuses on results and doesn't waste time with the "right" way. You introduced bread baking to me and I am very thankful.
I used my senses and ended up making a ceramic pot.
Boy i had zero luck with this one. Gave up after the 30 min bake, it was a gross gray blob. Not worth trying to save it. Don't think it was my yeast as I had just made pizza dough the week before and it was not old.
Jesse
Why don't you score it before putting it in the pot?
How is bread with 1 or 2 pinches of yeast going to rise in 30 minutes each time.
Adam my man… Come on..
Making bred is much easier…
Just discovered your channel. I love it..your informative and to the point…I;m going to explore your videos now.But in case you don't have it. I'd love tips on making pizza dough for my wood oven in larger quanties..When I have a party I'd usually make between 12 and 14 12" pies…i Buy the dough from my pizzeria..but I want to start making and using my own dough..thanks alot. keep up the great work.
Aaargh! Too much flower! Way to dense. Always fun to watch you though
"Thank you for your service, spoon." Had to say that because my spoon broke while mixing :/
woah
This guy seems cool but it's too bad the algo pushes this video to the top. Started out with it and wasted a lot of time. Just go get a recipe, and follow it. Your bread will be much better and more consistent
This channel is for people who don't cook. The failure to include measurements makes this impossible to remake at home.
I have personally used a cast iron skillet with a large pot on top(upside down obviously), although I have to perfect the preheating because the bottom of my loaf was too hard. Delicious and not burnt, but I wouldn't eat it with braces on. Haha. I put the skillet and pot in the oven the entire time the oven preheated to 450 F. Tonight I am going to make 2 loafs and am going to still put the pot in while preheating, but put the loaf in the skillet and put it on a burner until it is uncomfortable to touch. I never thought about putting my loaf on a baking sheet, but I think the skillet protruding up and out will keep the bread from touching the pot.
The best.bread in.the usa was Petaluma california…the san fran bread was for STUPID tourists..IT CLOSED BACK IN THE 90S I THINK
.MAYBE IT WAS THE 80S
People.laughed.at.the
TOURISTS THO
..we.got.to.talk to.a.Baker
They did.not.measure either
It all.depended upon the day .
And they did not let anyone hand.knead..YES HAND KNEAD IT it uNtil.they worked there.for 10 years…use TO.be 20.
ANYWAY .EVEN.THO.THE DAY.WAS FOGGY AND REALLY.REALLY COLD AT 3AM
HE DID NOT.HAVE A SHIRT.ON
ANS.THAT.BREAD SLAMMING UP ON.THAT.SWEATY FAT BELLY.
MOAT.PEOPLE.WOULD.GAG I SUPPOSE BUT
THE REAL TRICK.WAS THE.BAKER HAD THAT YEAST ALL IN HIS BODY AMD.THE SALT.FROM HIS SWEAT.
.IM NOT JOKING.
I'm planning to combint this recipe with souerdough instead of yeast.
I have used a room temp vessel then in oven comes out great.
I like your simple easy method and instructions thanks
Folding the bread brings back memories of my Stretch Armstrong.
made a gorgeous loaf and then kicked seven bells out of it with the knife D:
let the blade do the work for you buddy
isent dutch oven when you fart under the covers and fester in it?
My husband who's name is Brian was standing next to my screen just as it said "if you think my bread is bad you better blame Brian," and the hand was pointing right at him.
Is there any reason why you couldn't wet the parchment on the tray before putting the dough on it? It seem like that could add a little moisture.
Rye my dude. I usually fed my wild yeast with rye / white flour mix.
And made sourdough with wholemeal bread flour, 50g rye, added some pumpkin, sunflower, and sesame seeds.
I just love the flavor of rye, not just in bread but whiskey too.
It's Devil's Night 2022, and this video has 666k views and was posted 6 months ago. Now is the time to click… muwahahHAHAHAHAHAAAAA!!!
I've been trying to get the cuts right. I've used a serrated knife and a sharp sushi knife. I've found that I like kitchen shears best. You have to be careful to gradually pull the scissors away as you close them so you don't go too deep in the middle.
takes whole day to make 1 bread :U
Wet the knife first before scoring! Then it’ll slide right through without grabbing the dough!
It's interesting watching folks who don't have to measure things to bake. I unfortunately lose my mind a bit if I find that I can't measure out my ingredients because baking to me is a science and proportions must be kept in check if I want to do any experimenting with flavors or techniques, I'm just too methodical to do what Adam does. (Plus, due to me having chronic wrist pain, I couldn't do all that mixing in the bowl. I have to use my stand mixer when I make bread) I like seeing that he has great results with his methods though, don't get me wrong!