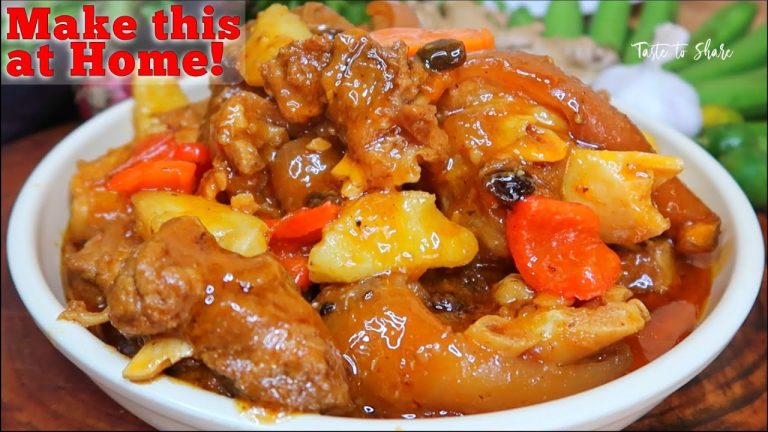
Moo Shu Pork — Cook Once, Stir-Fry All Week (No Wok)

Cook once, eat all week: this is Moo Shu Pork (aka mu shu pork) built for the home kitchen — no wok, no raw-meat handling on weeknights, and it comes together as fast as soft scrambled eggs. We gently poach pork belly (twice-cooked-pork logic) to render fat + convert collagen to gelatine, then portion it so you can stir-fry one serving at a time with egg, ginger, scallion and cucumber for a clean, classic profile. Serve it with rice, pancakes/tortillas, or lettuce wraps — you’ve got a whole week to play with it.
⸻
*Part 1: Batch-Cooked Pork (Do Once)*
*Ingredients*
• Pork belly, skin on — 1 kg
• Water — enough to fully submerge the pork
• Ginger — 30 g, lightly smashed
• Scallion — 2 whole stalks, cut into large sections
*Method*
1. Gently cook the pork
Place the pork belly in a pot and cover with cold water. Add the ginger and scallion. Bring slowly to a gentle simmer (occasional bubble only), then reduce to the lowest heat that maintains it. Do not salt. Cook for 75 minutes, aiming to render fat and convert collagen to gelatine without tightening the meat or skin.
2. Cool and portion
Remove the pork and allow it to cool to room temperature for easier handling. Reserve the rendered fat and the light, gelatinous stock separately. Portion the pork for the fridge or freezer. At this stage, the pork is fully cooked and ready for multiple uses.
⸻
*Part 2: Moo Shu Pork (One Pan, One Meal)*
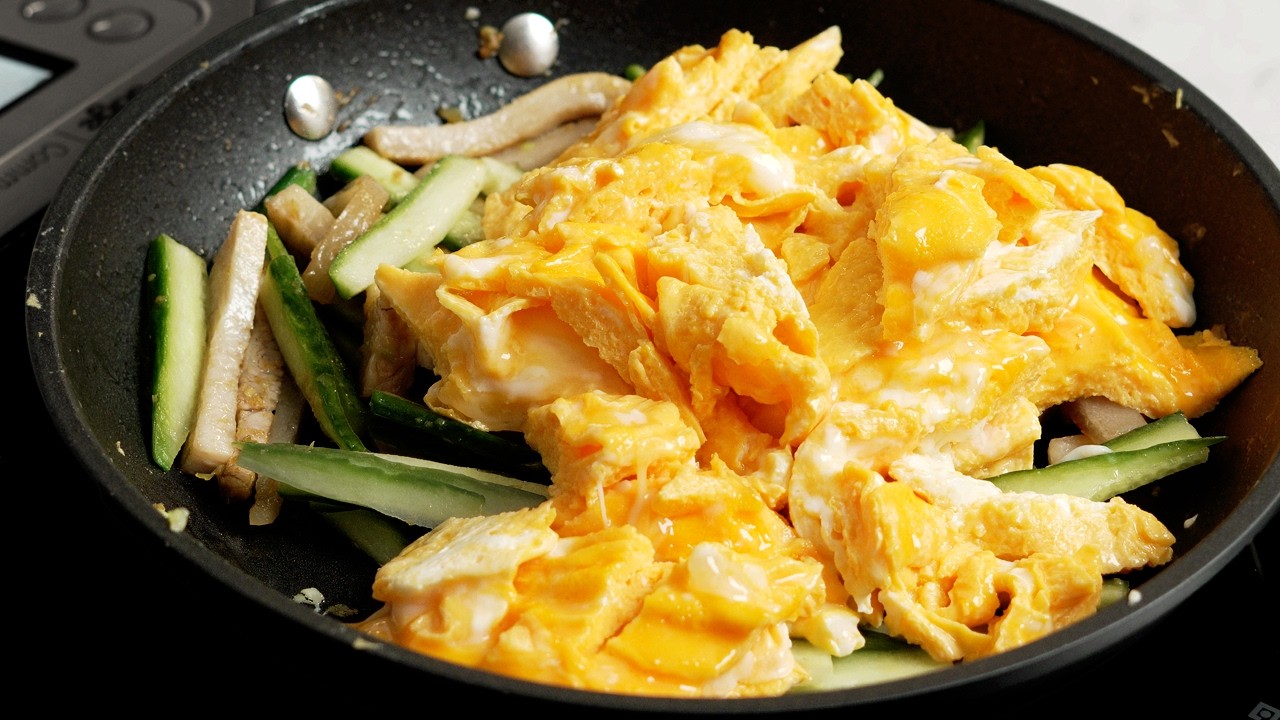
Recommended Per-Serving Ratio: 3 : 1 : 1 by weight (egg : pork : cucumber)
*Ingredients*
• Batch-cooked pork belly — 100 g, sliced
(fat and lean separated if desired)
• Eggs — 300 g, lightly beaten
• Water — 15–20 g, mixed into the eggs
• Cucumber — 100 g, seeds removed, sliced
• Ginger — 5 g, finely grated
• Scallion whites — 10 g, finely minced
• Reserved pork fat — 10–15 g, as needed
• Light soy sauce — to taste
• Fine salt — to taste
*Method*
1. Cook the eggs
Heat a non-stick pan over medium-low heat with a thin layer of reserved pork fat. Lightly season the eggs with salt just before cooking. Add the eggs and cook gently, allowing the bottom to set before moving. Adjust heat as needed. Cook until about 70% set, still soft, then slide straight onto the serving plate.
2. Render the pork fat
Return the pan to medium-low heat. Add the sliced pork fat and cook gently to render some fat without browning aggressively. Optionally skim excess fat to control richness.
3. Aromatics and pork
Add the grated ginger and scallion whites and cook briefly until fragrant. Add the remaining pork and warm through gently — this is a clean dish, not a browning step.
4. Season
Season lightly with soy sauce and salt. Keep it restrained; the dish should stay clean and egg-forward.
5. Cucumber
Add the cucumber and cook for no more than 10 seconds, just to take the raw edge off while keeping crunch.
6. Combine
Return the eggs to the pan, roughly cut into bite-sized pieces. Fold everything together gently. Wipe excess fat from the plate edge if needed. Stove off and serve.
____
📸 *Follow us on Instagram* »
#W2Kitchen #chineserecipe
source
Want more stir-fry ideas? 🔥 Watch our Chinese Stir-Fry Hack next → https://youtu.be/dL_JuZfeb20
one of the best channels on youtube, full stop
I'm making this
Could you cover egg foo young? I've got the gravy down but I feel it can be made better. Is "as good as the Chinese food place downtown" the best I can hope for?
is your channel finally starting to get some attention?? About time!
2:05 Thank you for that, i like to learn things like this 🙂
No salt, no soy nothing?
suggest adding dark soya sauce for color, and chinese wine for aroma
Could you please teach us how to make rabbit stew? I only have a regular pot (no slow cooker, pressure cooker, instant pot, or dutch oven). Is it doable?
are those strips of fat good to eat? its not too much fat?
Why use a toxic nonstick pfoa pan ? Gross
That "..Non-Stick skillet.." pan move was smoooooth. Worth it. We notice 😉
4:15 just casually flexing his setup like that
Ive joined few weeks ago and the channel was below 110k.
Nearing 128 now. I have a feeling soon you will get shared by someone with huge reach and then on the way to 1mil it is. And rightfullly so, love the content and the vibe. Thanks and GL!
I think you've really got your presentation and editing dialed in. It exudes the same efficient, effective, yet all-encompassing aura as your cooking. Every episode feels like a master class.
I sincerely appreciate your stinginess with dish washing. So many other cooking sources obviously learned to cook with someone else doing the dishes.
Ah, that camera setup at 4:15 explains why the wide angle perspective distortion makes your forehead look much larger. When using a camera at that distance zoomed out, you really want it a little lower and perfectly straight, not tilting down. (4 cameras? Wow!)
One of the best cooking chanels.
Ever since Rush Hour I've been wondering what this is.
To my American taste, it's not Mu-shu if it lacks the cabbage, carrots, and wood ear mushroom.
That, and a good swipe of some Plum sauce on a pancake.
Beautiful! Will 100% try this one 😀