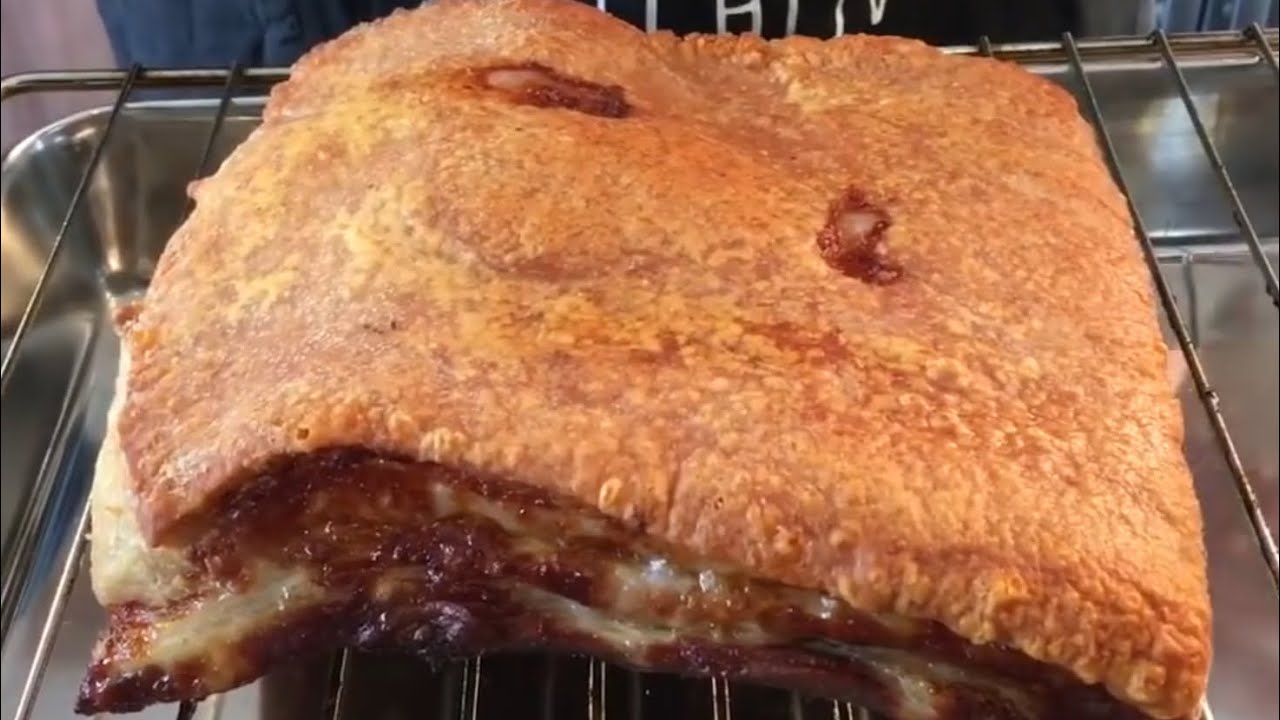
SECRET REVEALED! Oven Baked Crispy Pork Belly 脆皮烧肉 Chinese Roast Pork / Roasted Pork Belly Recipe

We always achieve extremely crispy and yummy Chinese rRoast Pork (Chinese Roasted Pork) with this method. This recipe differs slightly from our recipe for oven baked crispy pork knuckle. With this video, you now know what’s our secret to achieving very crispy and crunchy (same meaning :-0) Chinese roasted pork belly. Just follow our recipe and we guarantee that you can achieve very good results every time.
Refer to the ingredient list below or go to our webpage for easy reference:
Hope you can recreate this yummy dish in the comfort of your home. Thanks for dropping by our channel.
Please subscribe to stay tuned to our home cooking videos.
Follow us on:
Youtube: www.youtube.com/spicenpans
Facebook www.facebook.com/spicenpans/
Instagram @spicenpans
Blog: www.spicenpans.com
Chat with us!
info@spicenpans.com
Thanks for watching!
See you soon.
xoxo
Jamie
on behalf of Spice N’ Pans
Ingredients:
Serves 40 (assuming about 1 piece per person)
2kg pork belly
3 cubes of fermented bean curd
1 tablespoon of five spice powder
0.5 tablespoon of salt (normal)
2 tablespoons of rice wine
0.5 tablespoon of baking powder (not baking soda)
1 tablespoon of coarse sea salt
1 to 2 tablespoon of white vinegar
A few dashes of white pepper
Temperatures used
180C for 1 hr (middle rack)
240C for 20 mins
Remove from oven and then brush oil on skin. We used peanut oil. Please do not use olive oil as it has Low smoking point unless if you’re using very high quality olive oil
Back in the oven at 240C for 20 mins (top rack)
Note:
Please pay attention when it’s roasting in the oven during the last segment of 20 mins. If your pork skin starts to brown too much, you wanna reduce the temperature. No worries if they are a little charred. You can use a butter knife to scrap the charred bits out.
source


Thanks so much, tried it today, Christmas day and skin was incredibly crackling and tasty😜🤪❤💥💯
Hi Roland, I am located in the US and it is pretty difficult to find a fresh slab of pork belly. While it is easier to find frozen ones, my question is if it is okay to first defrost the frozen pork belly overnight in the fridge, then rub the seasoning into the defrosted meat on the 2nd day (then dry it overnight in the fridge again) and finally bake the pork on the 3rd day? Not sure if it is safe to consume pork that has been defrosted, then processed then cook (over 3 days). Also, would you advise to wash the pork belly once it is defrosted? Appreciate your advice and I hope this thread is still alive! Thank you 🙂
Ok I love your videos and watch every one……But i gotta ask what is up with your left pinky nail???????
How can you dock the skin without one of those fancy piercing tools?
Thank you for your generous sharing and step by step video. I did it yesterday and it was successful. Very crispy skin I got. However my pork belly is only 1 kg, so I half the ingredients. I did not follow the last step (putting peanut oil) and bake it for another 20 minutes as it was oily enough. It turned out well. Thank you so much.
Hello. While this video seems pretty straightforward to follow, he is not clear on a few things. Is the oven temperature that he mentioned Celsius or Fahrenheit? Also is the oven set to bake or to broil? Thank you
Hi if its 500g of pork belly how long should I put it in the oven for 180c
Hi chef l made quite abit of the crispy pork belly but once l took it out from the fridge to reheat it but the top but of the skin is soft already how to make it crispy again,thks
Man I'm salivating …
Hi. Any recommendations for a substitute for the rice wine?
Amazing recipe! About the marination and placing in the fridge, if I were to cook it for dinner would it be too late to start the marination in the morning and leave it for 10-12hrs?
Thank you Jamie & Roland! This just emerged from my oven today and the skin is absolutely crackling! Great stuff!
However, it was a tad salty… not sure if it was the marinate or the second part of the salt coating.
Will try to refine, but gratitude! 🙏🏼 🇸🇬
Thank you for your unselfish act to give this recipe that turned out extremely well. I had tried to cook this Sio Bak on many occasions and failed. This time, with your recipe it works and the Sio Bak is very delicious and the meat is not dry. The crackling is crunchy and not hard that it will break my teeth.
Baking powder or baking soda?
How to you re-crisp the pork if kept in the frig for next day consumption?
my pork belly full of bones 😢
Thanks. It’s so yummy looking. Will try making it after the pandemic 😷
After remove the salt after the 1st time bake.. is it apply with vinegar or peanut oil ya? Because ur description stated is oil but in video u mention vinegar. Thanks
Why your pink nail so long? 🤔
Why does the skin seperated from the meat while cutting
My family favorite thing definitely going to try your recipe
Looks very yummy 😋
nice choice of food I Love your recipe for your cooking.
Baking powder or baking soda.?
Love it..this is the best recipe ever..your recipe actually works.
Do you have the fan on in the oven?
I like to follow your recipe. Very simple. TQ🙏🙏🙏👍👍👍
Hi chef and everyone, is the coarse salt that is coated on the skin absolutely necessary? Can substitute with fine salt? Can anyone advise please. Thanks
Tried this last week. Was very nice. I didn’t taste the crispy skin but little meat to sample. Rest i froze it andI delivered it to my parents today . Hope they love it. I am trying another one today. Leaving it in the fridge to marinate and dry. Tomorrow will roast it.
I love all your Chinese food recipes very simple 😋😋😍
If I use less pork, do I reduce the cooking time? Thanks so much for this recipe:)))
Tried this today…..turned out fantastic….TQ Spice N' Pans
Thanks chef…will try soon
Cheers
I keep having large blisters on the roast pork skin. Is there a reason why this is so as I followed the recipe and steps?
Why not put the pork belly on a stainless steel rack to put into the fridge so the moisture under the pork belly can be sucked up by the fridge?
Woooow… I love roast pork 👌🏽👌🏽
Why the nail… Whyyyyy!!! 🤢
looks delish…. I believe I saw a puppy, and did I hear a bird ? show us your pets one day 🙂
can't understand your speech
Just love a your videos you make every thing you cook simple and easy to follow 😁🤟
Hi can i use apple cider vinegar?
Any option for peanut oil? We have grapeseed oil would that be ok?
Why Do You Use Baking Soda in your simplified Pork Belly Recipe and Baking Powder in this recipe??
Good day to you sir. #spice n pan. Im one of your avid viewers. Im from cebu city philippines. I hope i can try this as well for my family soon. Its very well explained. Hope you can make a video on how to make a chinese ngohiong with original sauce. Id really like to learn it from u. Tnx a lot n more power to your show………
I wish mine turned out like your crispy pork
Yum
Made this just now, it didn’t crack but chau ta already . After first round of 1 hour bake at 180c. A little burnt on the side . After second round of baking at 240c. No crack. After third time of baking at 230 cause will be very Chao da- also cannot pop / crack. The skin is 50% burnt. Failed
My employer ask me to follow this video 🥰
I got so nervous cause my oven is filled with thick smoke 🤣 and this is my first time using microwave oven🤣
Sorry if my questions were stupid…I receive no reply 🤣
can i marinate n leave pork for 2 days?