
Whole Wheat Artisan Bread | Healthy Choice
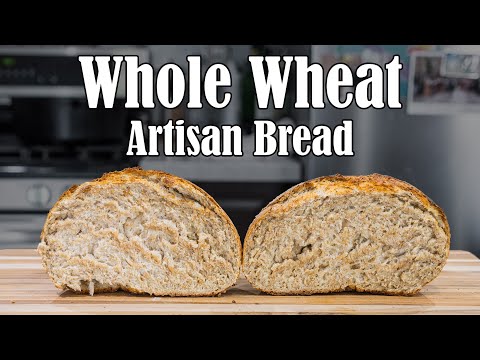
Join me in this video as we explore the process of making a delicious and wholesome Whole Wheat Artisan Bread. With minimal ingredients and simple techniques, you can create a crusty and flavorful loaf right at home. Don’t forget to subscribe to my channel for more baking inspiration and tasty recipes!
SUBSCRIBE to This Channel
Check out my blog
Ingredients:
1 tsp activated yeast ≈ 5 grams
2 tsp sugar ≈ 10 grams
1 tsp salt ≈ 5 grams
1 ½ cups of water (110°F) ≈ 355 milliliters
3 cups of whole wheat flour (approximate values)
Whole wheat flour: Approximately 360-375 grams
Instructions:
In a mixing bowl, combine the activated yeast, sugar, salt, and water. Allow the mixture to sit for 5 minutes to activate the yeast.
Add 3 cups of whole wheat flour to the bowl. Mix until all the flour is incorporated and no dry patches remain.
Cover the bowl with a cloth and let the dough rest for 1 hour, allowing it to rise.
Fold in all sides of the dough to release any excess air and enhance the structure.
Proof the dough for an additional 1-2 hours, allowing it to rise and develop flavor.
Preheat the Dutch oven to 450°F (230°C).
Carefully transfer the dough into the preheated Dutch oven, ensuring it is evenly shaped.
Cover the Dutch oven with the lid and bake the bread for 35 minutes.
Remove the lid and continue baking for an additional 3 to 5 minutes to achieve a golden crust.
Once baked, remove the bread from the Dutch oven and let it cool before slicing.
*************************************************
🍳 * My Go To Kitchen Equipment *
Dutch Oven 7-Quart
– CA:
– US:
Cast Iron Skillet 10”
– CA:
– US:
Cast Iron Reversible Griddle
– CA:
– US:
Precision Cooker
– CA:
– US:
Stainless Steel Stock Pot 16-Quart
– CA:
– US:
Air Fryer, 3.8L
– CA:
– US:
Instant Pot 8 Qt
– CA:
– US:
Hand Mixer
– CA:
– US:
Instant Read Food Thermometer
– CA:
– US:
Steamer Rack Trivet
– CA:
– US:
🍞 * My Baking Essentials*
Silicone Spatula
– CA:
– US:
All Purpose Flour
– CA:
– US:
For Bread Homestyle White Flour
– CA:
– US:
4-Quart Rimmed Mixing Bowl
– CA:
– US:
Kitchen Dishcloths
– CA:
– US:
Fleischmann’s Yeast
– CA:
– US:
Fleischmann’s Quick-Rise Instant Yeast
– CA:
– US:
Vanilla Extracts
– CA:
– US:
Baking Soda
– CA:
– US:
Baking Powder
– CA:
– US:
📷 * My Production Gear *
Panasonic Lumix DCGH5M2
– CA:
– US:
Panasonic LUMIX G X Vario II 12-35mm
– CA:
– US:
Panasonic HX025 25mm/F1.4 ASPH
– CA:
– US:
Manfrotto Tripod
– CA:
– US:
Microphone
– CA:
– US:
DISCLAIMER: The description contains affiliate links, which means that if you click on one of the product links, I will receive a small commission. This helps support the channel and allows me to continue to make videos like this. I am a participant in the Amazon Services LLC Associates Program, an affiliate advertising program designed to provide a means for me to earn fees by linking to Amazon.ca. As an Amazon Associate I earn from qualifying purchases.
source


The music is annoying and distracting.
Does it need sugar?
Woow.. Dicoba besok…
I baked this bread today and it was a success. Crusty from the outside, soft from the inside n tasty. Thank you
Don’t need the music.
I wouldn’t add the salt into the yeast. I add later.
Is the sugar necessary?
To my fellow bakers: YouTube videos are a showcase of one's achievements. They are not instructional videos. This is a great example of omitting some KEY TIPs that makes him achieve the air bubbles. One can follow the "directions" implicitly and achieve the same dense, 1 ton, whole wheat loaf. No where does he explain how to achieve such an airy-ideal loaf, even with his skipping the 2nd hour of proofing. Great calming voice and presentation, and thanks for sharing what gear you used to film this. Good luck!
Waiting for it to "cool/rest" is good, but, honestly? NOTHING beats a slice of freshly cooked (wheat) bread, when it's nice and warm.
Hi! A question: Can I cook this bread in La CLoche instead io the iron dutch oven? Thanks.
TY. ❤ video. Straight to the point- east to follow instructions – simple – fantastic result. Making it right now 🙏😊
Hi,
Thanks for this simple recipe. You are working with nearly 100% hydrated dough. It is usually very srticky with so much water. Yours does not appear very sticky. What is your secret? How strong is your flour? It says "all purpose", but it appears to be of much better grade. Right?
Thanks again.
Can milk be used instead of water?
Wow! Looks great. I'm going to give this a try today. 😀
Nice one Canadian bruh did you use 100% whole wheat flour or a mix of the two flours? Thanks.
I dont have a dutch oven… is that a problem
Excellent recipe and well done. So yummy 😋 😋 Your new subscriber
What if i dont have a dutch oven?
When I bake baguettes I spray some water into the oven to increase crispiness. If I spray a little water into the dutch oven after placing the dough will the bread be crispier?
What if i dont add sugar? I dont eat sugar so can i add honey to it?
Bred 👍🏼
Darn I don’t have a dutch oven 😮😅
Is there a way to make this without a dutch oven? It looks delicious
i did exac mesurements, but my dough is too sticky and too spread around do not look like a ball 🙁 any ideas?
Love fresh bread but it is too hot to make in the summer
U the best I did it perfekt thank you I dont want to see the other 👏👍
After you put it on the parchment paper, you can let it rise again before putting it in the Dutch oven. You get fluffier, less dense bread that way.
I just made this and it’s delicious. I was skeptical at first because mine didn’t raise as much, but it’s so good!
I just made bread for the first time using this recipe and it turned out great! Its been quite cold here so I used a heater for the first proof and then left the dough overnight in a small room for the second proof. Rose quite nicely and baked well in the oven. Thanks for sharing it 🙂
I’m amazed that you can achieve a crumb texture like this with all-purpose flour. Very impressed!
Can u knead instead?
They say you should wait a minimum of 1hr before cutting your bread. I usually wait till he gets down to room temperature
Thanks for sharing new banner to your house
First: never cut it HOT
Second: it looks absolutely UNFERMENTED.
A LOT OF THANKFUL COMMENTS LIKE OH! Thanx, this is my first bread recipe 😂😂😂😂 it’s way better than the supermarket bread. No it’s not! UNFERMENTED mean UNHEALTHY!!
Try to cook well fermented, healthy bread first than record a video. Pffff
Made bread for the first time following your recipe. Came out looking great. Didn't like the taste that much – but I deduced it was my Asian palette's natural preference for a bit more salt than was recommended! Thanks for this recipe!
Why is my dough so sticky and flat?
can you add nuts??? and if so, would you have to compensate with more water, flour or anything else? or, uhmmm I have no clue. Your bread is my second one I've made in my life, I am excited!! thrilled as a matter of fact!!!
Will it hurt if I let it rise hours? Like all day?
Mixing bread with a spatula….hahahahahaha. Get those hands into it.
Hi love this! Can you tell me what’s the final height of your baked product ? I can only get mine to a final height of 3”
This is my go to recipe video for WW bread. Bread from the supermarket has a lot of bad stuff in it and having control over how it’s made is great. Thank you.
Thank you for a simple delicious loaf recipe. 💜
I don’t have a Dutch oven, what can I use ?
I have to make this bread 👍🏼