Easy Homemade Sourdough Bread | A Basic No Knead Recipe That Gives Amazing Results Every Time

An outstanding basic no kneed sourdough bread recipe that produces amazing results consistently. This is a “bare bones” recipe to help new bakers understand the process and get to grips with their first loaf without worrying about too much technique.
FULL RECIPE:
MOST COMMON QUESTIONS ABOUT MY NO KNEAD VIDEO:
GET THE SOURDOUGH CALCULATOR:
WIRE MONKEY LAMES:
SOURDOUGH STARTER:
EQUIPMENT:
Check out the Wire Monkey lames –
Risdon & Risdon Apron: 5% discount code – Explore22
My Komo Flour Mill – 5% discount with Checkout code: culinaryex5
Bread basket:
Bench scraper:
KD-8000 dough scales:
Precision scales:
Bread tins:
Challenger bread pan:
As an Amazon Associate I earn from qualifying purchases.
IMPORTANT NOTE:
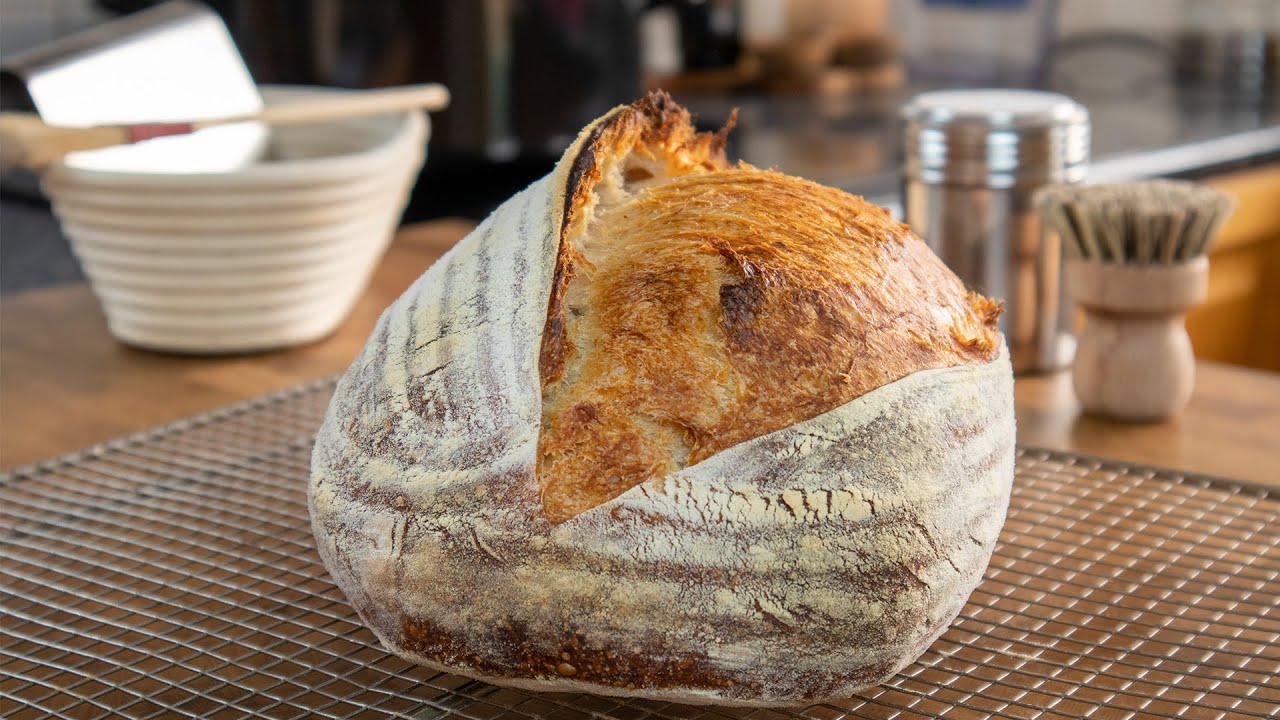
You need to use flour with a high protein content to achieve the same results. I am using a non-speciality all-purpose flour with a protein content of 13.2%
The protein content is very important as it contributes to building the gluten in the bread. You will not have the same result if you use a low protein flour such as 10% or 11%. For this recipe, I would not use flour with a protein content under 12.5%, but would ideally suggest flour in the region of 13%
You can normally find the protein listed on the side of the bag in the nutritional details
If you use flour with a lower protein content then you will probably find the dough is very wet and sticky and will not develop the gluten network required to hold the shape.
There is no kneading as time will build the gluten network. There is also no reason to keep folding this dough. The final hydration is 71% and makes for very manageable bread dough. Please note that depending on the flour you use the “stickiness” may vary.
My kitchen temp was in the region of 16-18c.
My starter is fed at a ratio of 1:1:1 (Starter / water / flour) and therefore remains at 100% hydration making future recipe calculation easy. The flour is divided into 75% white flour and 25% wholewheat flour. Again, if you have any questions let me know in the comments.
My banneton size: 25cm across the top length, 15cm across the top width, and 8cm deep. This was advertised as 500g banneton but for my use, I find 750g works best. My recipe works out to 762g which fits perfectly!
Scheduling
You can use the fridge to put the “brakes” on your baking schedule. For example, you could mix your dough at 17.00 and complete through to the end of the bulk ferment before going to bed at 23.00. In this case, you could cover your dough well, I normally use a plastic supermarket bag, and then pop it in the fridge overnight. The next day you would let the dough come back to room temperature and the shape and place it in the proofing basket.
You can also refrigerate the dough while it is in the proofing basket and hold it overnight. Just remember that you will need to flour your basket very well as the dough may have more of a tendency to stick.
You can bake your dough directly from the fridge with excellent results. There is no need to let it come back to room temperature.
source


Thanks for watching – A few important notes regarding this recipe follow:
And to everyone who as asked to tag me in their bread pictures – My Instagram is @culinary_exploration
You need to use a flour with a high protein content to achieve the same results. I am using a non speciality all purpose flour with a protein content of 13.2%
The protein content is very important as it contributes to building the gluten in the bread. You will not have the same result if you use a low protein flour such as 10% or 11%. For this recipe I would not use a flour with a protein content under 12.5%, but would ideally suggest a flour in the region of 13%
You can normally find the protein listed on the side of the bag in the nutritional details
If you use a flour with a lower protein content then you will probably find the dough is very wet and sticky and will not develop the gluten network required to hold the shape.
Thanks and take care 🙂
Great bread! I've tried the recipe many times.
One question please, what's the ideal temperature of the dough at the end of the bulk fermentation, so as to know when to end this process?
Thank you in advance!
I’m so glad I found this channel. Other’s purposefully make it complicated and I’ve shy away from trying. I am day 15 of my starter and getting bubbles but not a lot rise for the moment. Was told to keep at it.
❤️
in 70% hydration do you also include the amount of water that the starter has?
I am a newbie and I am not from my country that uses grams I am from the United States and so you lost me I have no idea what you’re talking about. I’m sure it’s a good recipe it looks pretty simple straightforward but I don’t know how much to measure of anything so it’s totally useless to me. Most Youtubers will put out to the side what the US measurement is but you didn’t so I have no idea Si thank you enjoy your baking
May I ask you which cloche you used in the video?
Why are your measurements and directions different in the video than they are in the printed recipe? Which one is the correct one?
Yep. Just made it today and it’s really impressive how it turned out. But the impression I had was like a weak dough. I use to do the folds. Am I wrong about the weak impression?
Is The banneton neccesary? I dont have one 🙁
คุณทำขนมปังน่าทานมากคะ
Do you have the recipe written out with conversions please?
how about the temperature? what is your water temperature and how much is your room temp? thanks in advance!!
When you say "1 to 1 to 1 ratio" at around 50 seconds when you mention feeding your starter – 1 is water, 1 is flour, what is the other 1 (is it the same amount of existing starter)? Am re-watching your videos as I've not had much success, following methods in a book I bought -swinging from over proofed to under roofed. Many thanks.
💐💐💐💐💐💐
Thanks for the recipe. After the first mix, when I take out the dough to shape before the bulk rise my dough is MUCH stickier than yours. I used high protein bread flour Ave the exact same amounts. What could I try changing? Reduce the amount of water? I live in Malaysia so it can be pretty hot but this was in the morning when it’s relatively ok.
This really works! 👍
I have done your recipe but the only thing is not the same is the crust, the inside kind similar but I am hoping to get the crust what I have done wrong ?
Awesome
very nice video very informative and helpful..
my only issue is my dough is very sticky ……
can i bake this bread in a dutch oven using the first method?
I have tried two different loafs and they both came out a little flat… I'm not using a proofing basket but the cloth methood. My dough is also very sticky during the process but I'm scared to add more flour.
Hi do you fed your starter just one time? And how many hours it took time?
Mine failed! I was so careful and used a scale. I will try again😪 Baked with pot on top and water underneath with water. Did not rise or brown. Bread is hollow and really taste great! Oven set at 450F
Thank you for your practical, no-nonsense approach as am resisting buying gadgets such as a baking stone or a Dutch oven. Found the dough with this recipe was too wet, my dough wouldn't hold a shape so will reduce the water on the third loaf I make. Thanks again. Love your videos.
Thank you so much. This has given me the confidence to 'have a go' today – have had my starter for 2 weeks and was really quite fearful of all the processes of baking a loaf.
Do I need to refrigerate or can I bake it straight away after the final proof in the proofing basket??? Great recipe btw 🤗
Can’t wait to try this. If I don’t have a basket, what should I use?
Have been baking with conventional knead method for a long time, including sourdough, but this is a game changer. I've made two loaves now, and both came out perfectly. Thanks for fantastic, professional grade recipe
This recipe worked really well for me. Shame you changed it on the site. Made notes from the vid and will continue using this.
Thanks recipe,can you explain me please how have you done the starter from the jar? Thanks
I've just realized I've mixed up two recipes so if I leave this on the bench for 5 hrs I'll need to get up at 3am to shape it into the basket. Can I put it in the fridge to slow down the process until I'm up at 7am?
Beautiful. Thank you.
Hello! Is it possible to use 20-30% of the flour as a stone milled wholewheat flour?
There is no way this is all purpose flour. This is clearly a high gluten one